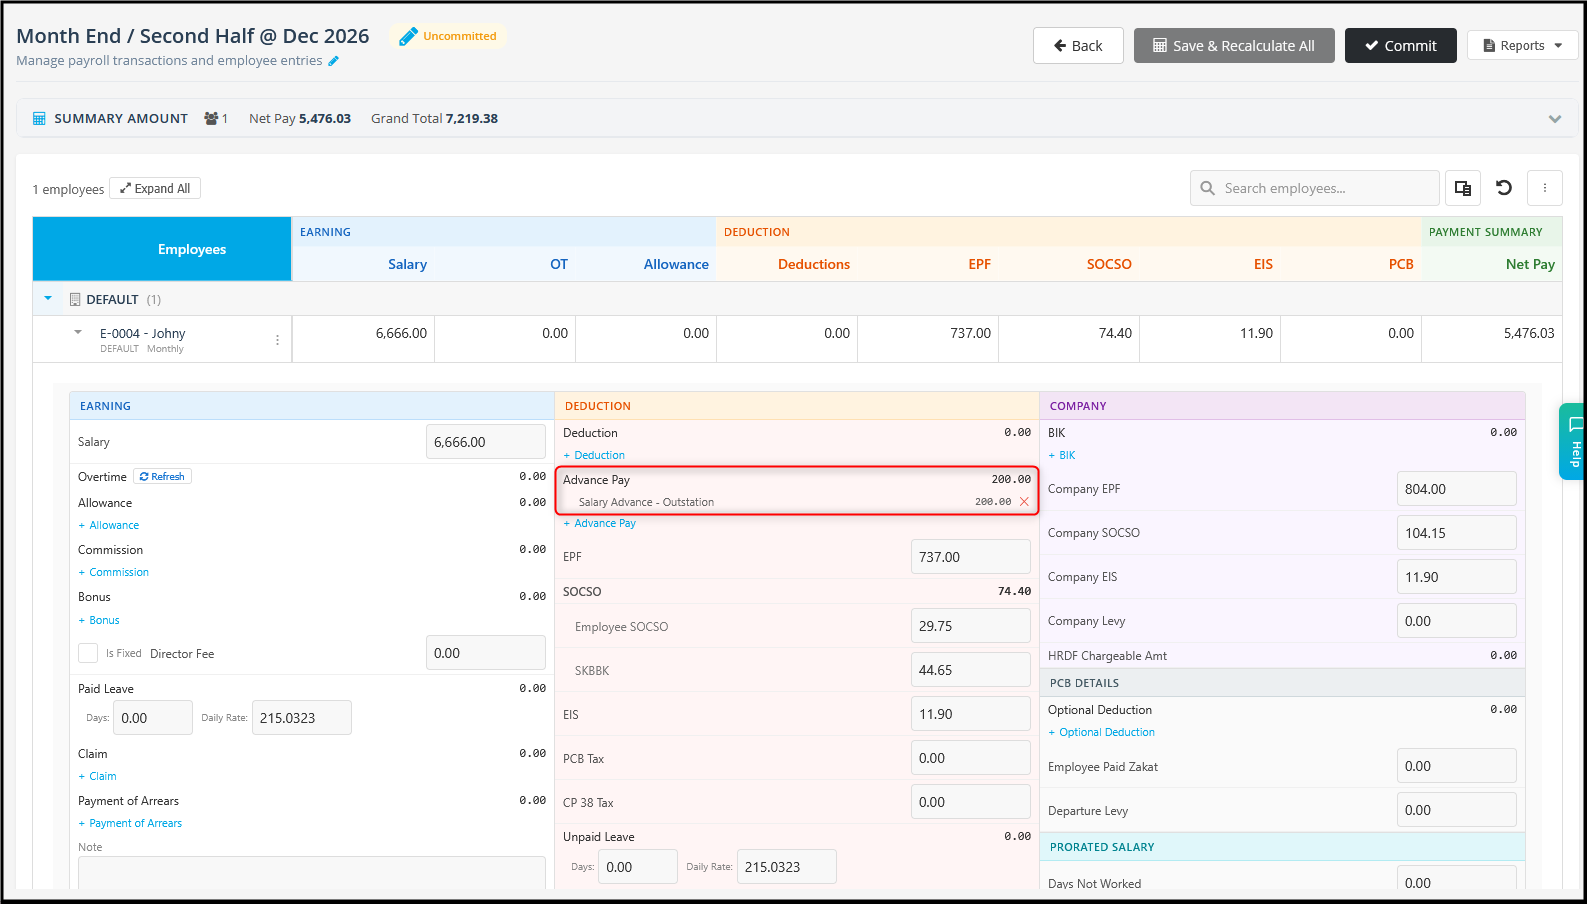
Loan and Salary Advance feature now allows employee(s) to apply for a salary advance or a loan directly from their Employee Self Service. A payroll user then approves or rejects the request. Once a request is approved, the payroll user can generate a bank payment file to pay the employee. The amount is then deducted from the employee’s salary in the month-end payroll.
| Salary advance | Loan | |
| What it is | Part of your salary, paid to you early. | A larger amount that you repay in monthly instalments. |
| Limit | Up to 50% of your monthly salary. | Set by Payroll User for each loan type. |
| How to apply | Enter the amount and a reason. | Choose a loan type, then enter the amount and the number of months to repay. |
| Repayment | Deducted in one payment (as Advance Pay) in the payroll month you select. | Deducted monthly in payroll until the loan is fully paid. |
How to use Loan and Advance in Auto Count HRMS:
Before you start
Give employees access to apply for loans and salary advances (Payroll user)
Employees can’t apply for a loan or salary advance until they have access. Set this up first.
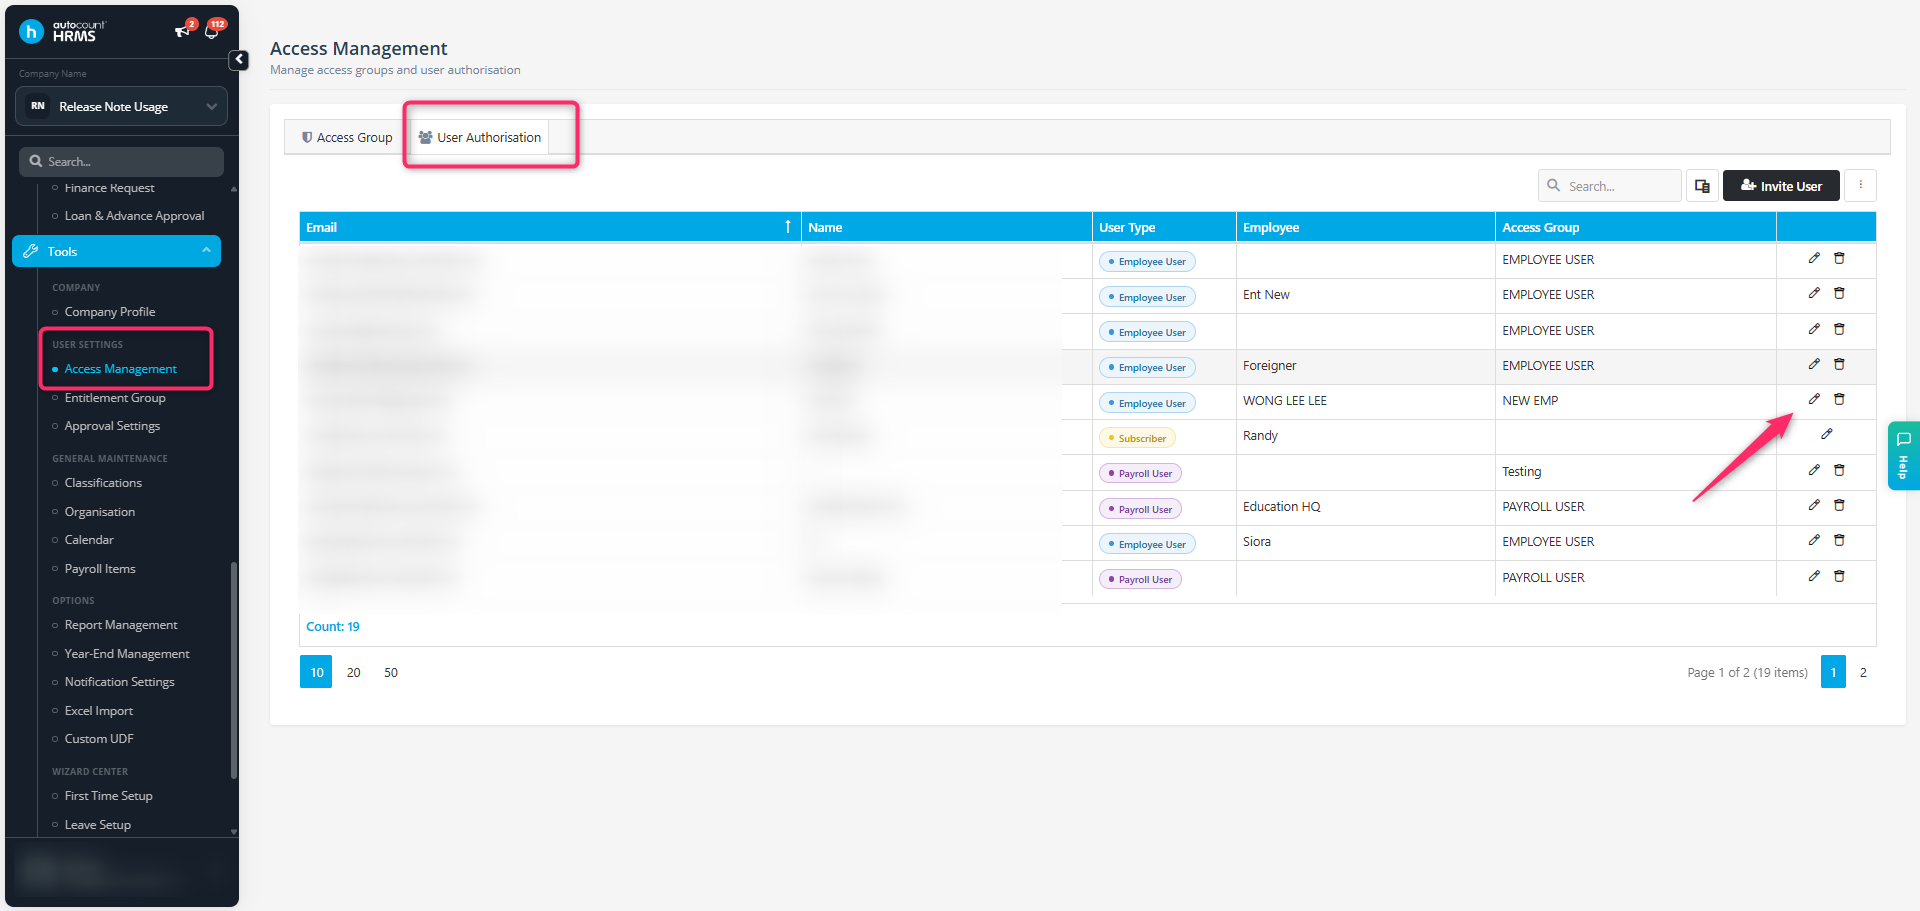
- Go to User Setting > Access Management > User Authorisation.
- Select the employee, then click Edit.
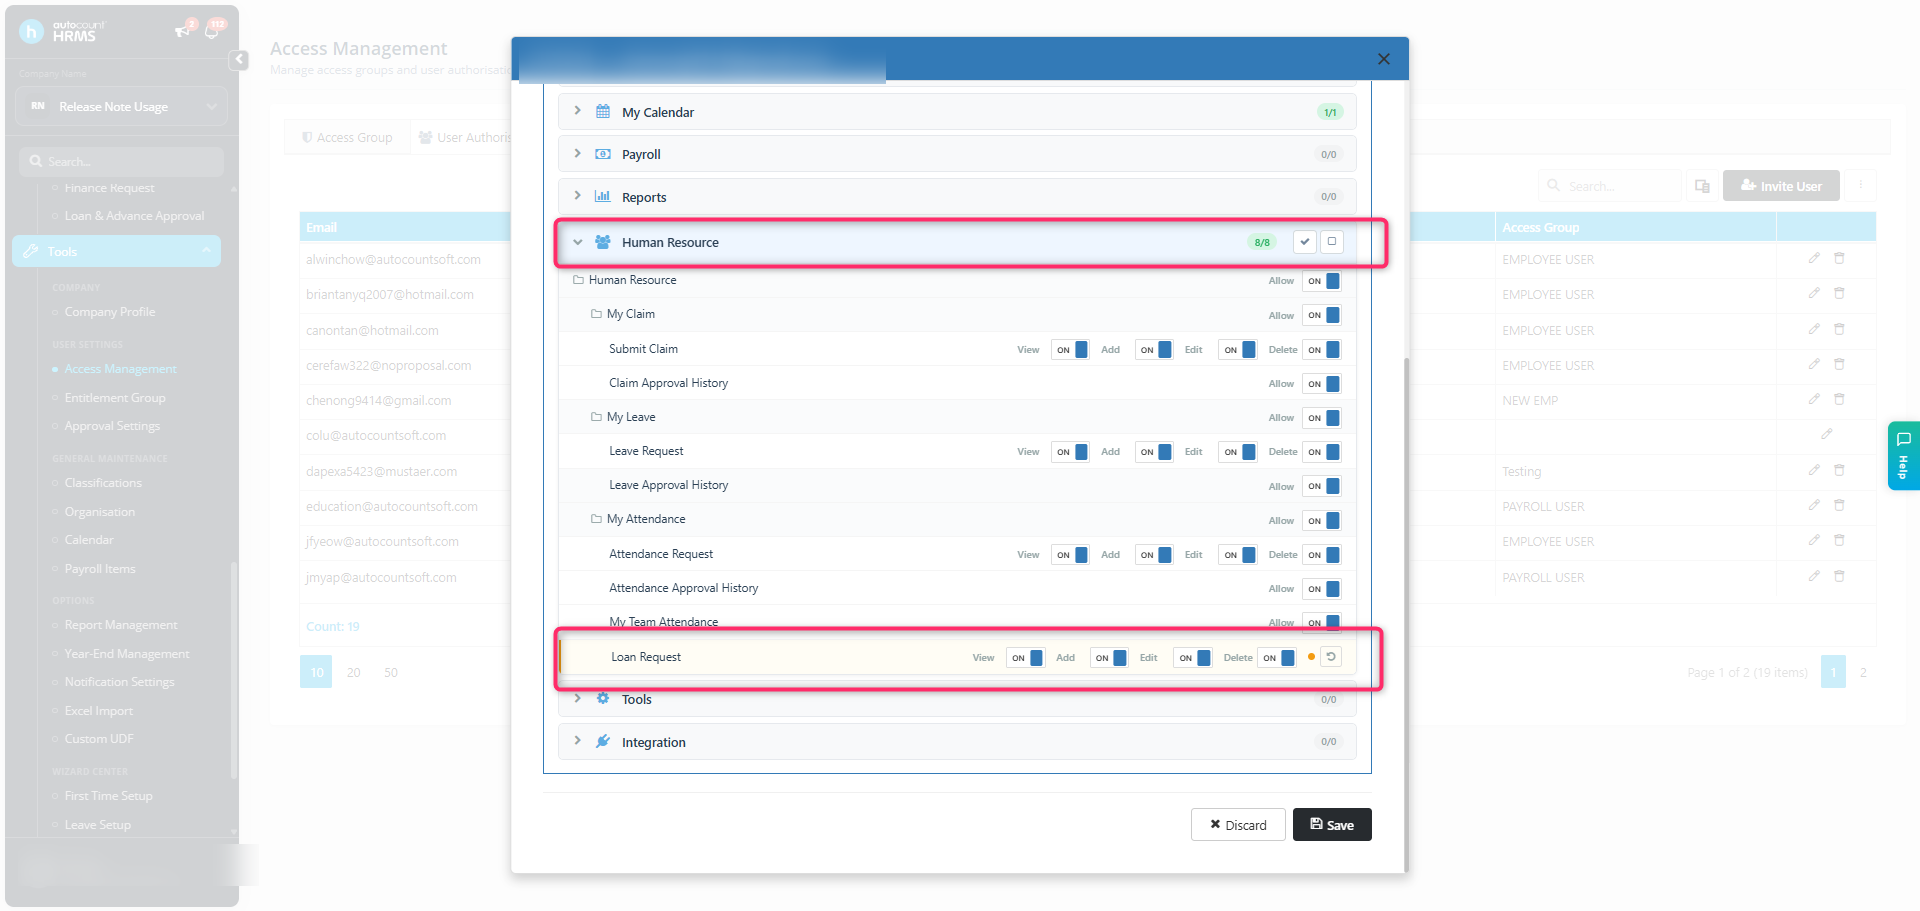
- Under Access Rights > Human Resource > Loan Request, turn on all access rights.
- Click Save.
Employees with this access can now apply for loans and salary advances from Employee Finance.
Loan
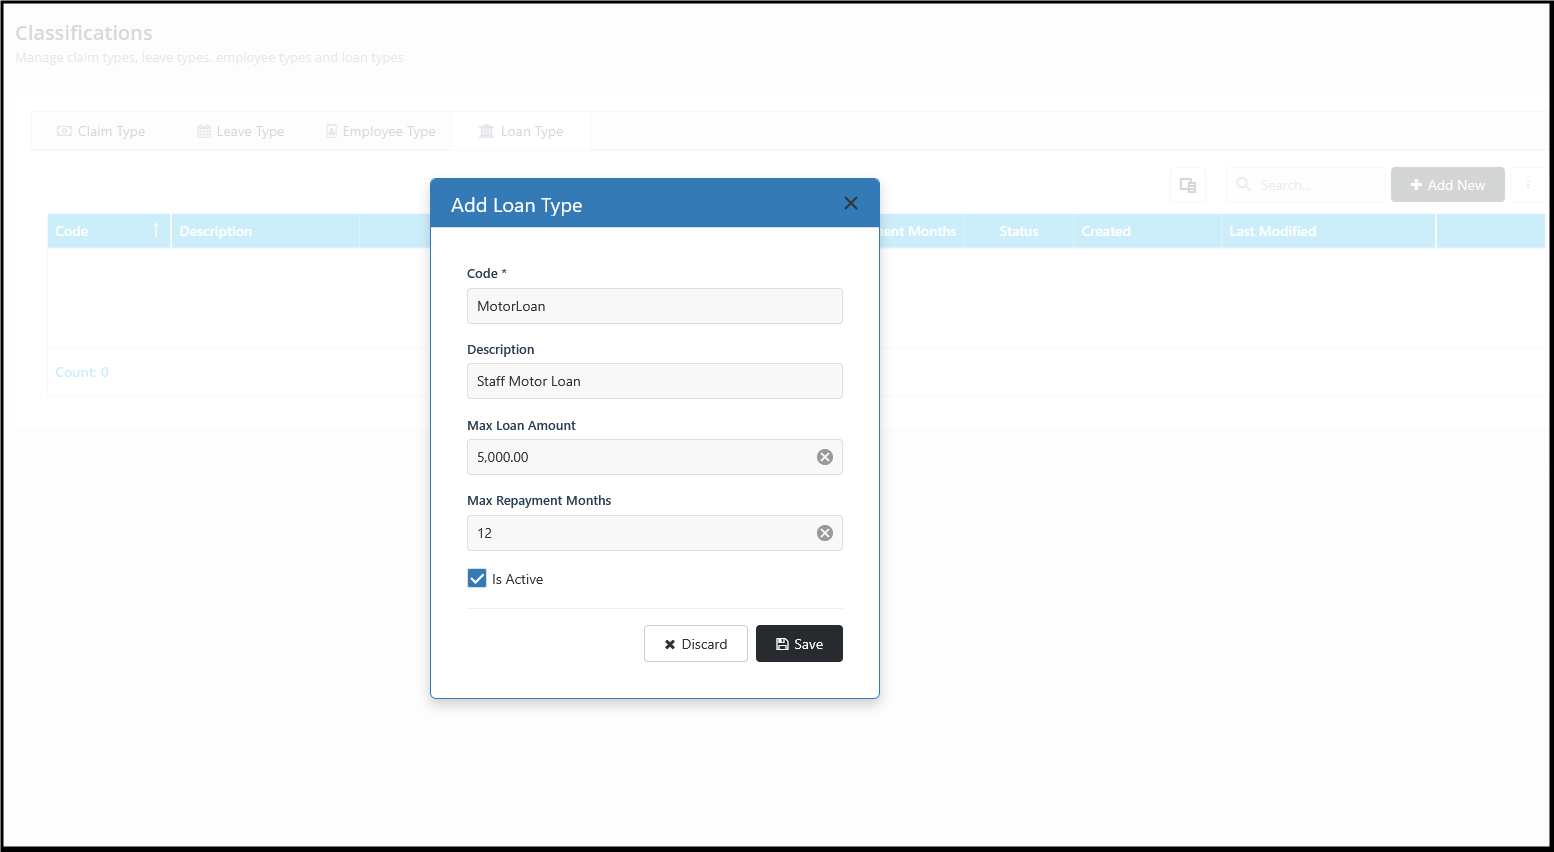
1. Create a loan type (Payroll User)
Go to Tools > Classifications > Loan Type > Add New
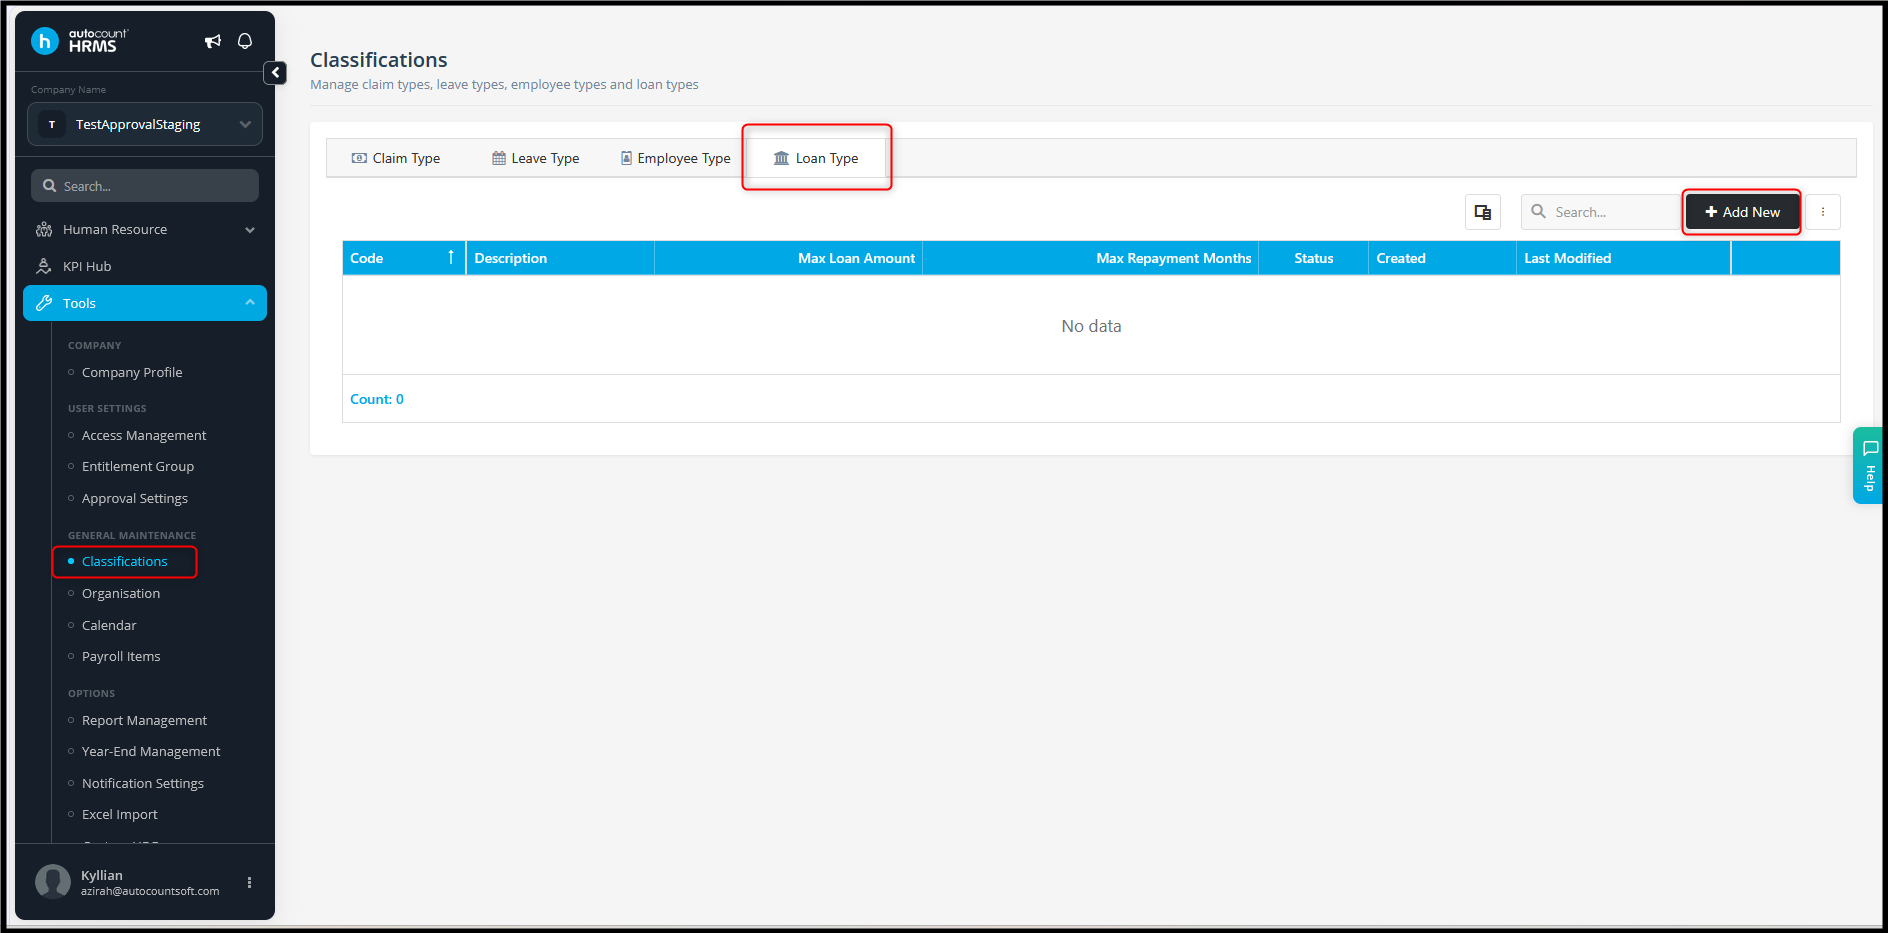
2. Fill in the details and Click Save.
- Code (required): A short code for the loan type, e.g. MotorLoan.
- Description: A name employees will easily recognise, e.g. Staff Motor Loan.
- Max Loan Amount: The most an employee can borrow under this loan type, e.g. 5,000.00.
- Max Repayment Months: The most months an employee can take to repay, e.g. 12.
- Is Active: Keep this ticked so employees can select this loan type.
3. Apply for a loan (Employee User)
a. Go to Employee Finance > Finance Request > Loans, then click New Request.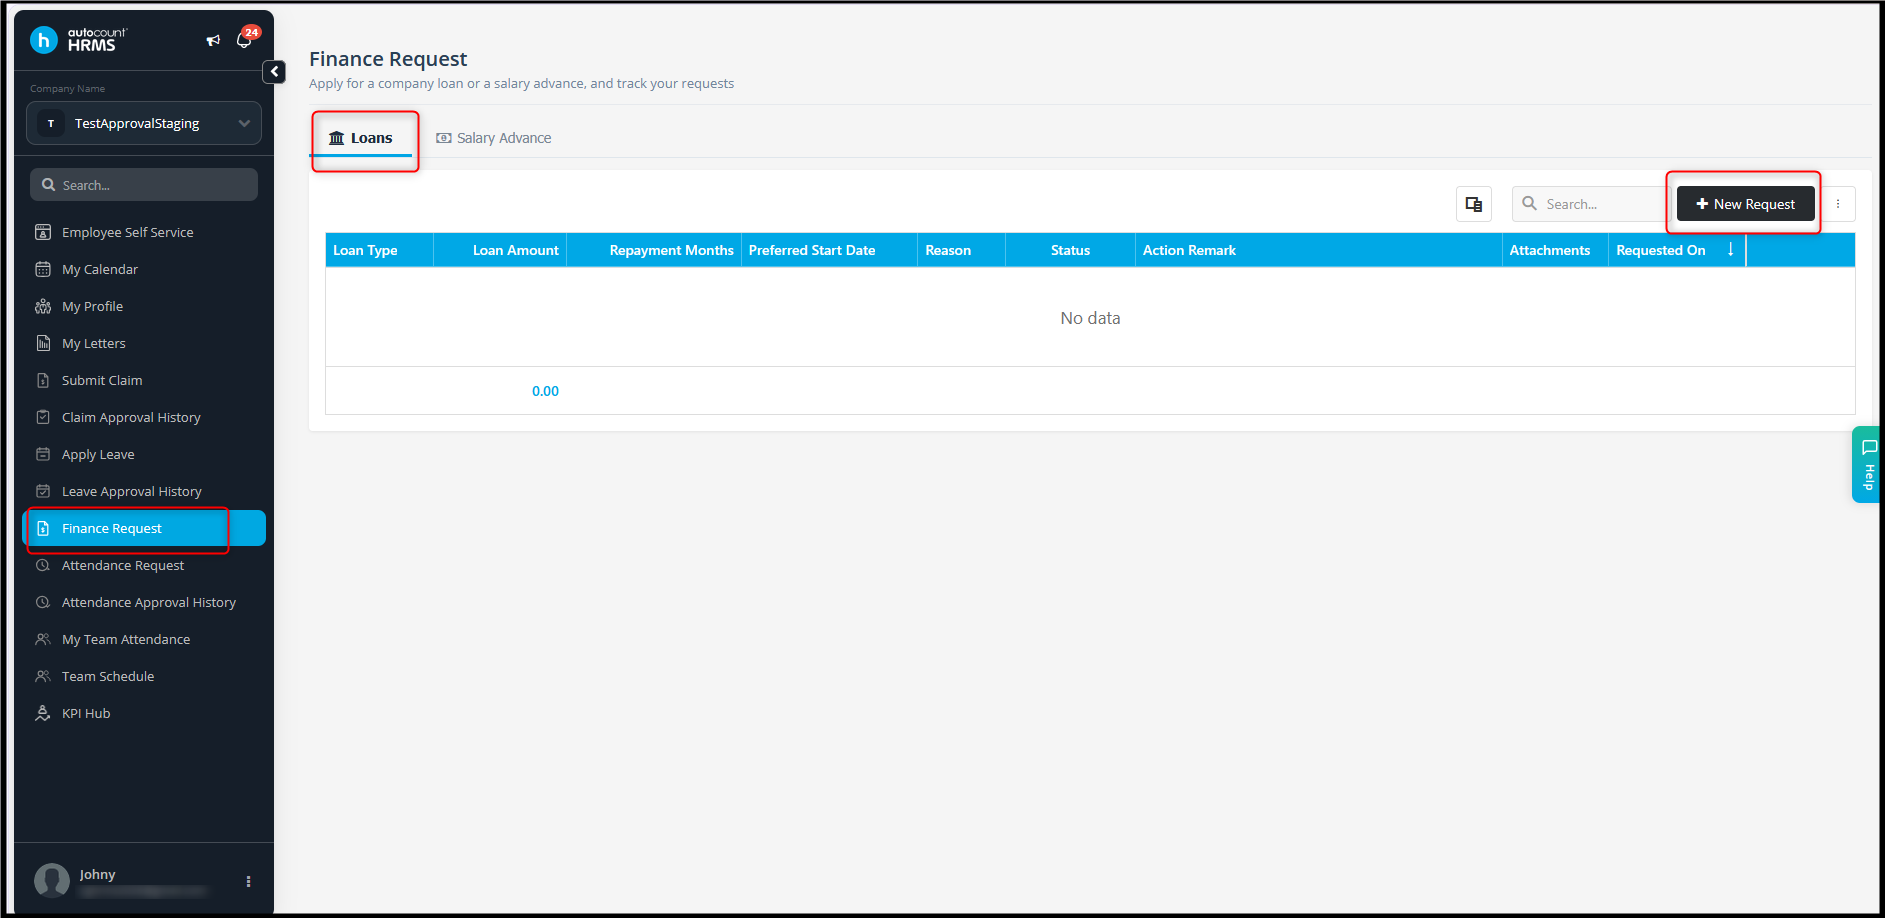
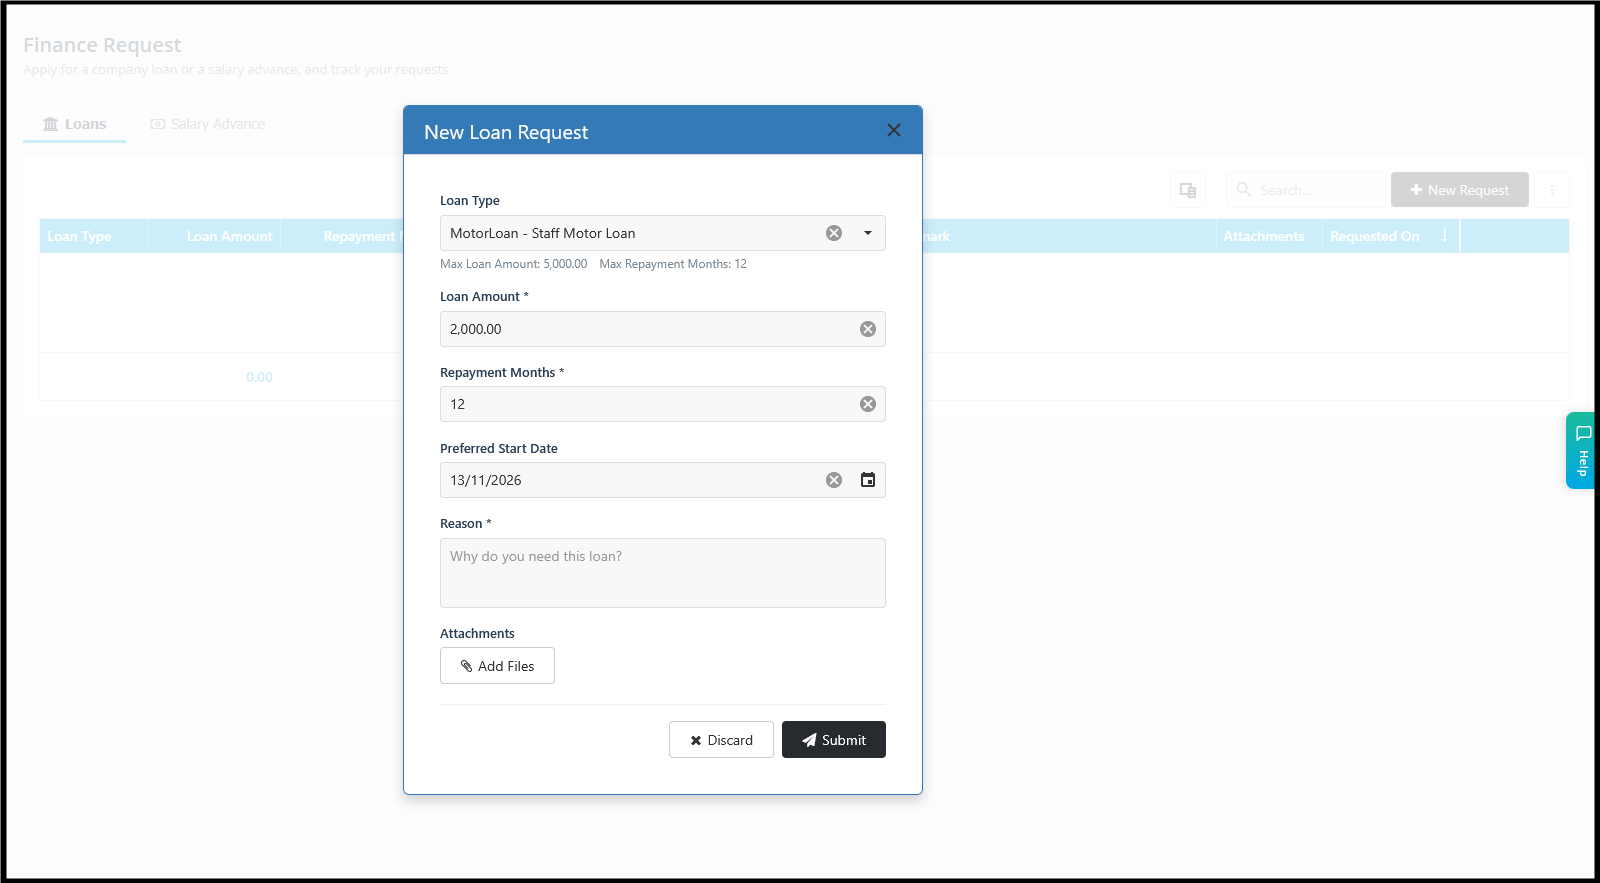
b. Fill in the form and submit
- Loan Type: Select a loan type from the list.
- Loan Amount: Enter the amount you want to borrow.
- Repayment Months: Enter the number of months you need to repay the loan.
- Preferred Start Date: Select the date you would like the loan to start.
- Reason: Explain why you need the loan.
- Attachments (optional): Click Add Files to attach supporting documents.
c. You cannot submit a new loan request while another loan request is still pending approval.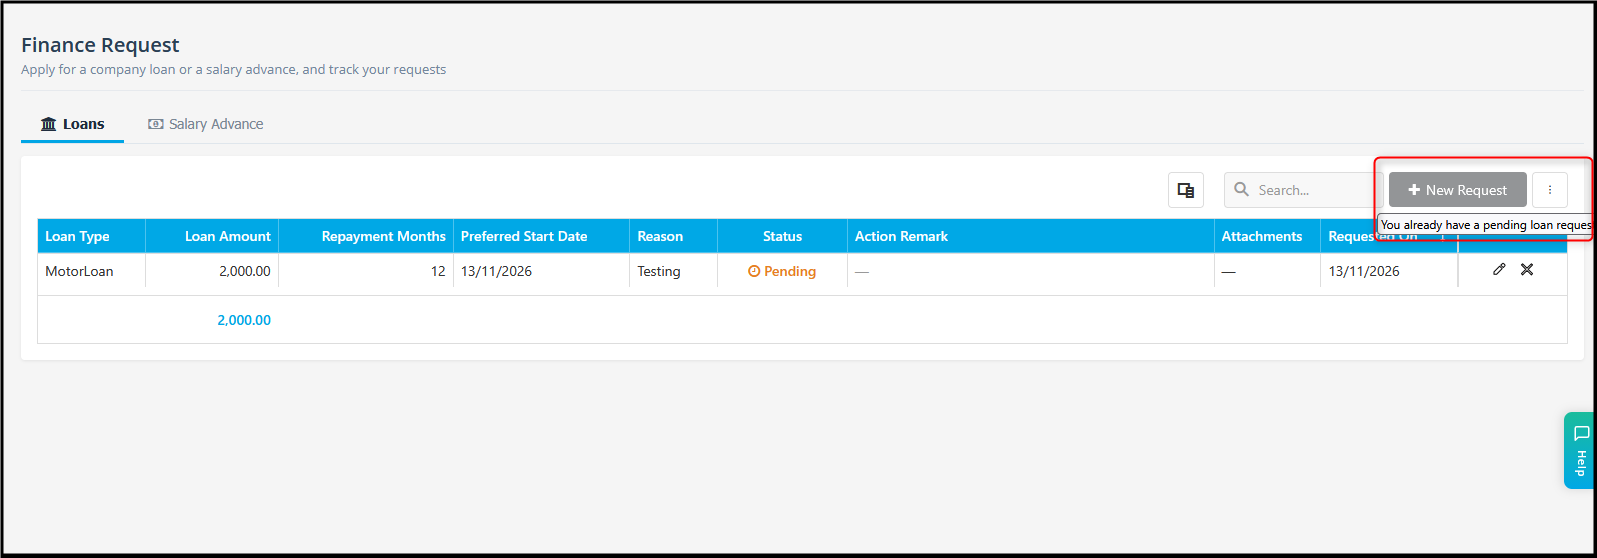
4. Approved the loan request (Payroll User)
You don’t need to set up an approval workflow. Any payroll user who has access to the employee’s entitlement group can approve the request.
a. Go to Employee Finance > Loan & Advance > Loans, then click Review.
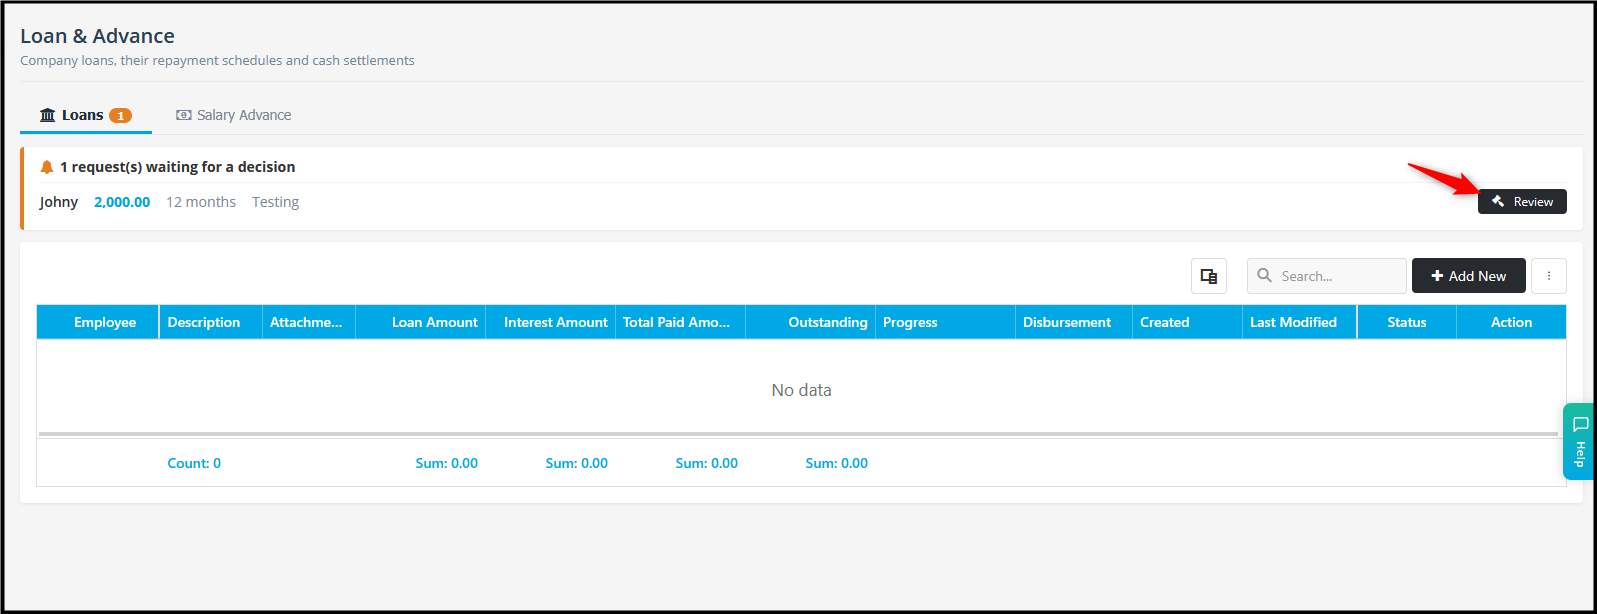
Check the details, enter your remarks, and click Approve.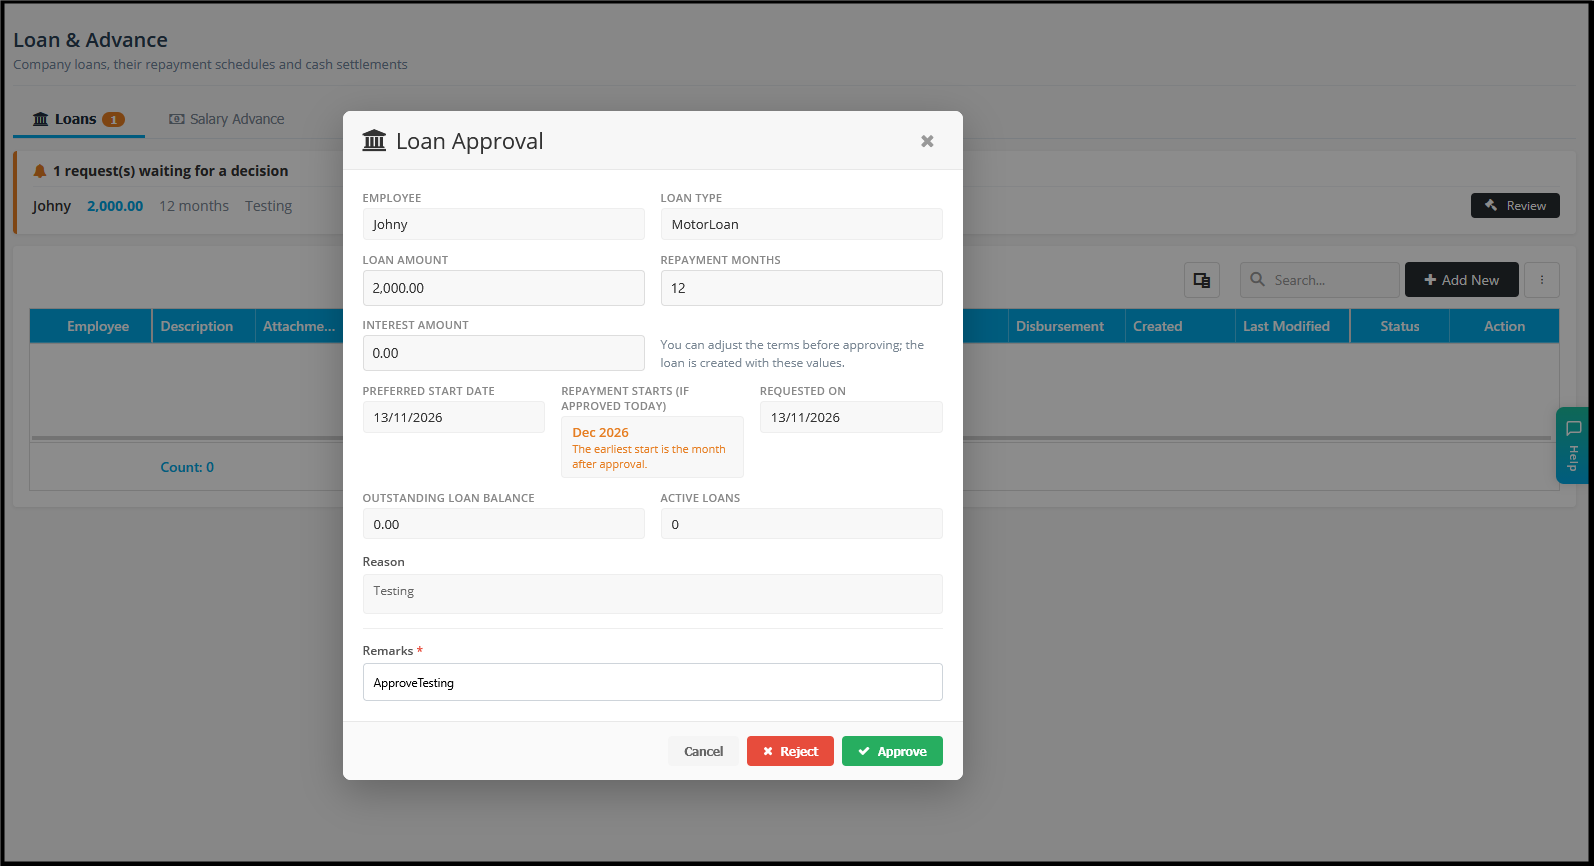
OR
b. Go to Employee Finance > Loan & Advance Approval > Loans, then click Review.
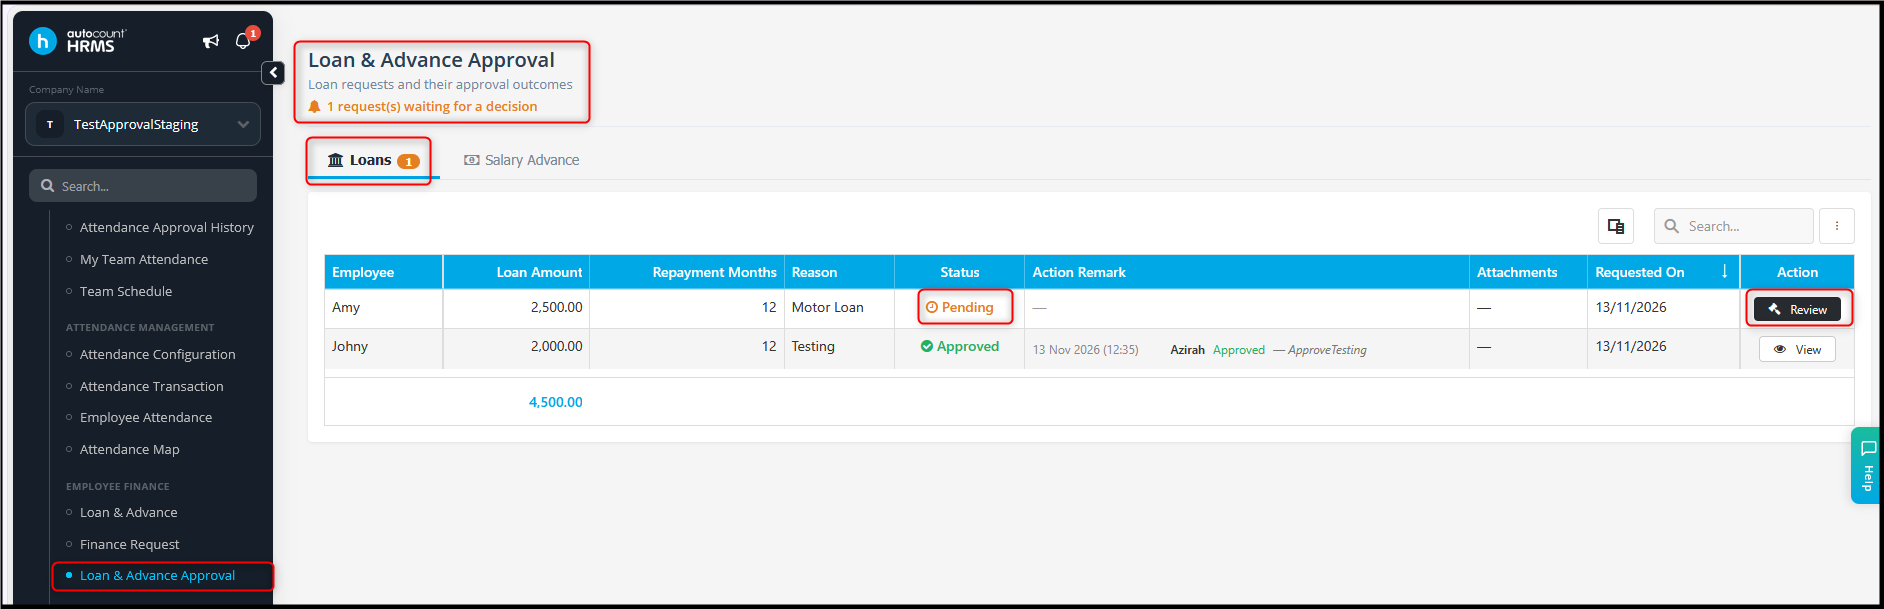
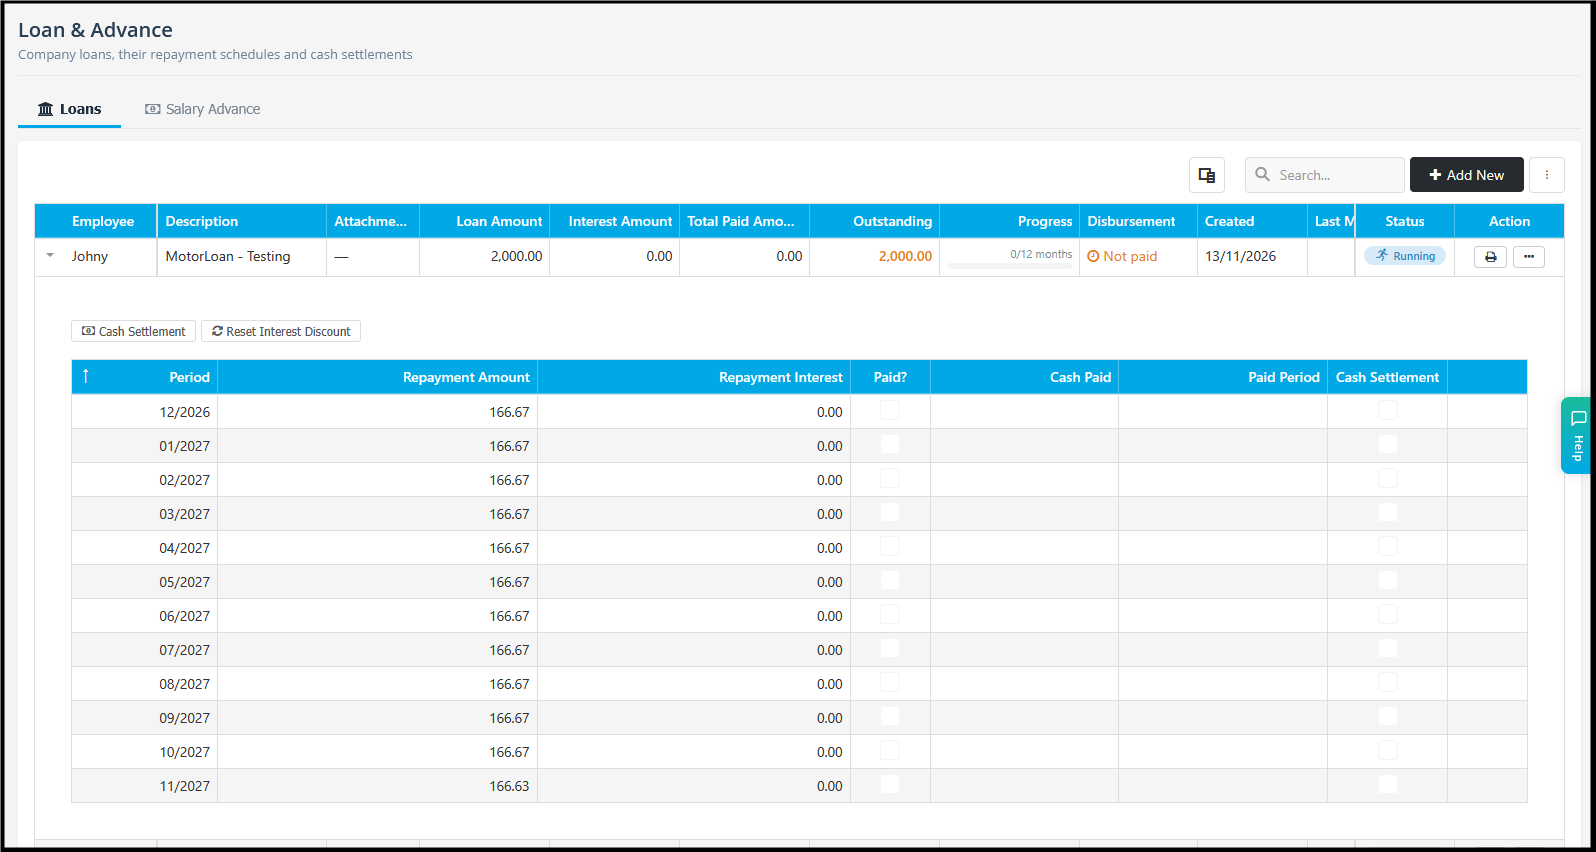
After approval, the payroll user can view the loan details and repayment schedule. Repayment starts period is automatically assigned.
5. Generate the bank payment file (Payroll user)
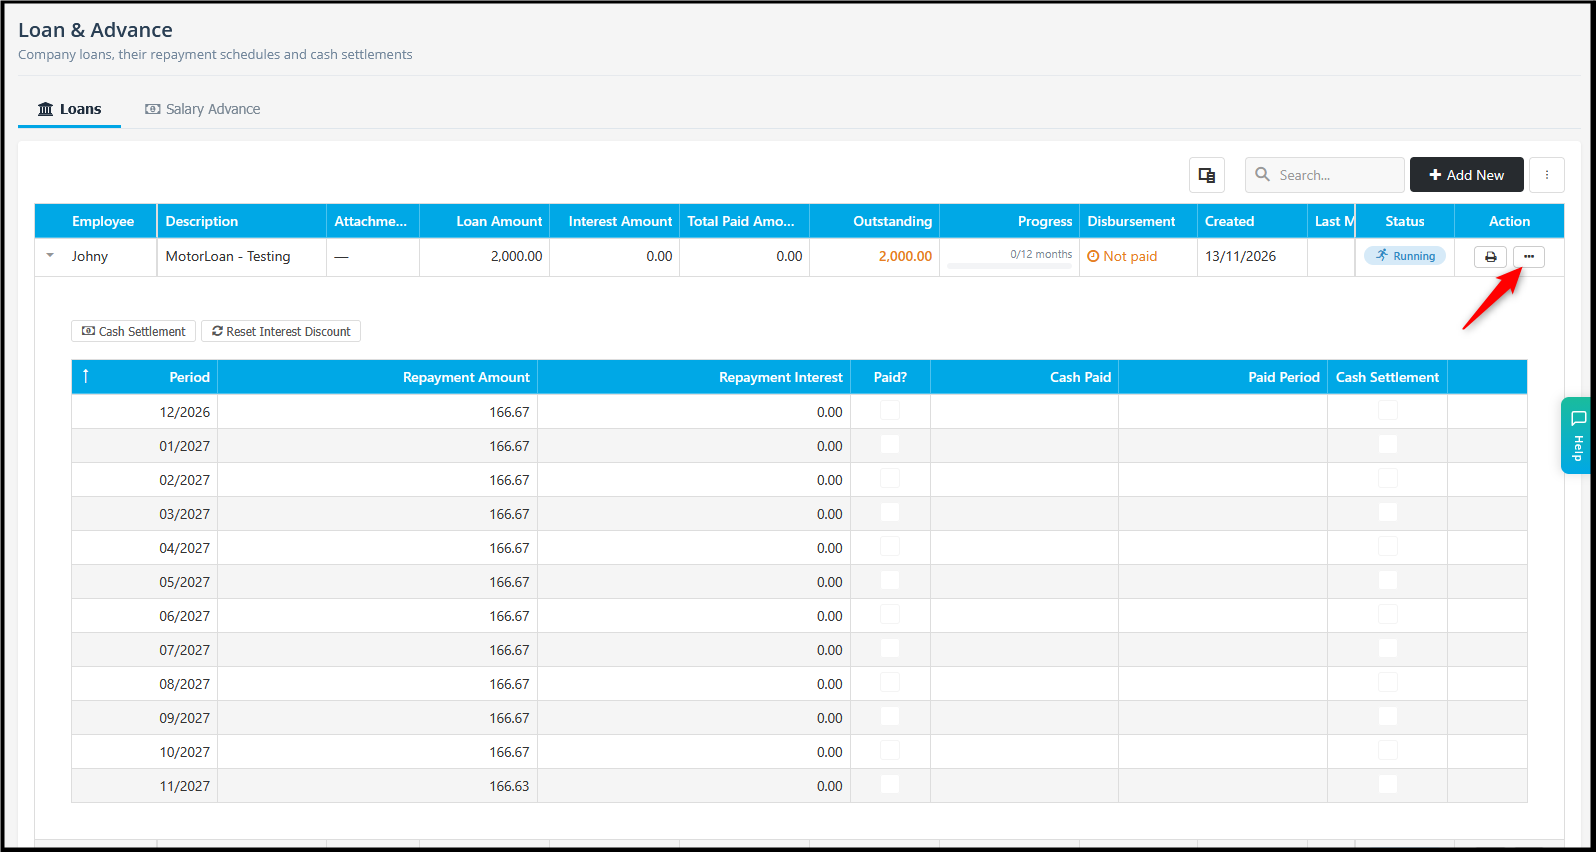
Go to Loan & Advance > Loans. In the Action column, click the three dots (…), then select Bank File.
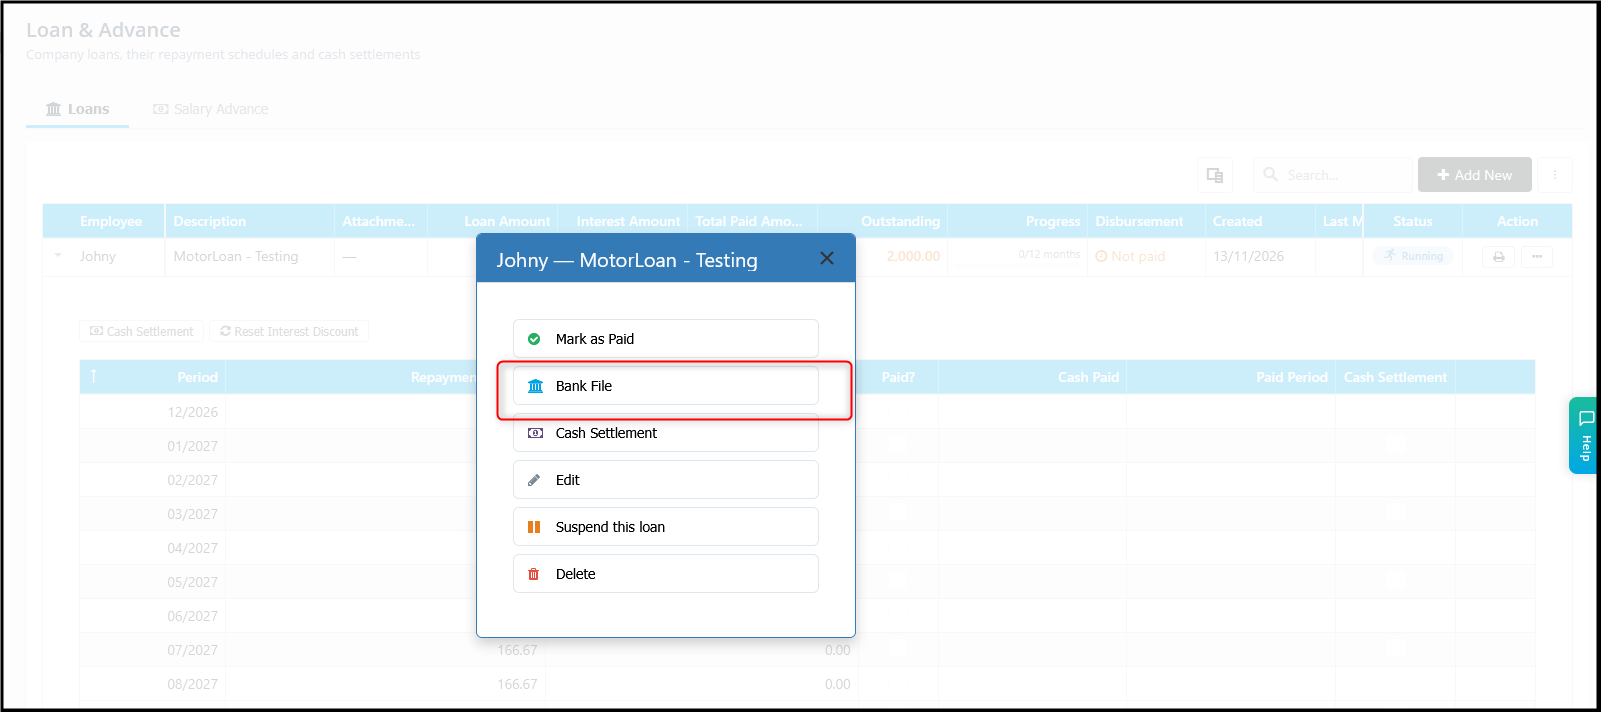
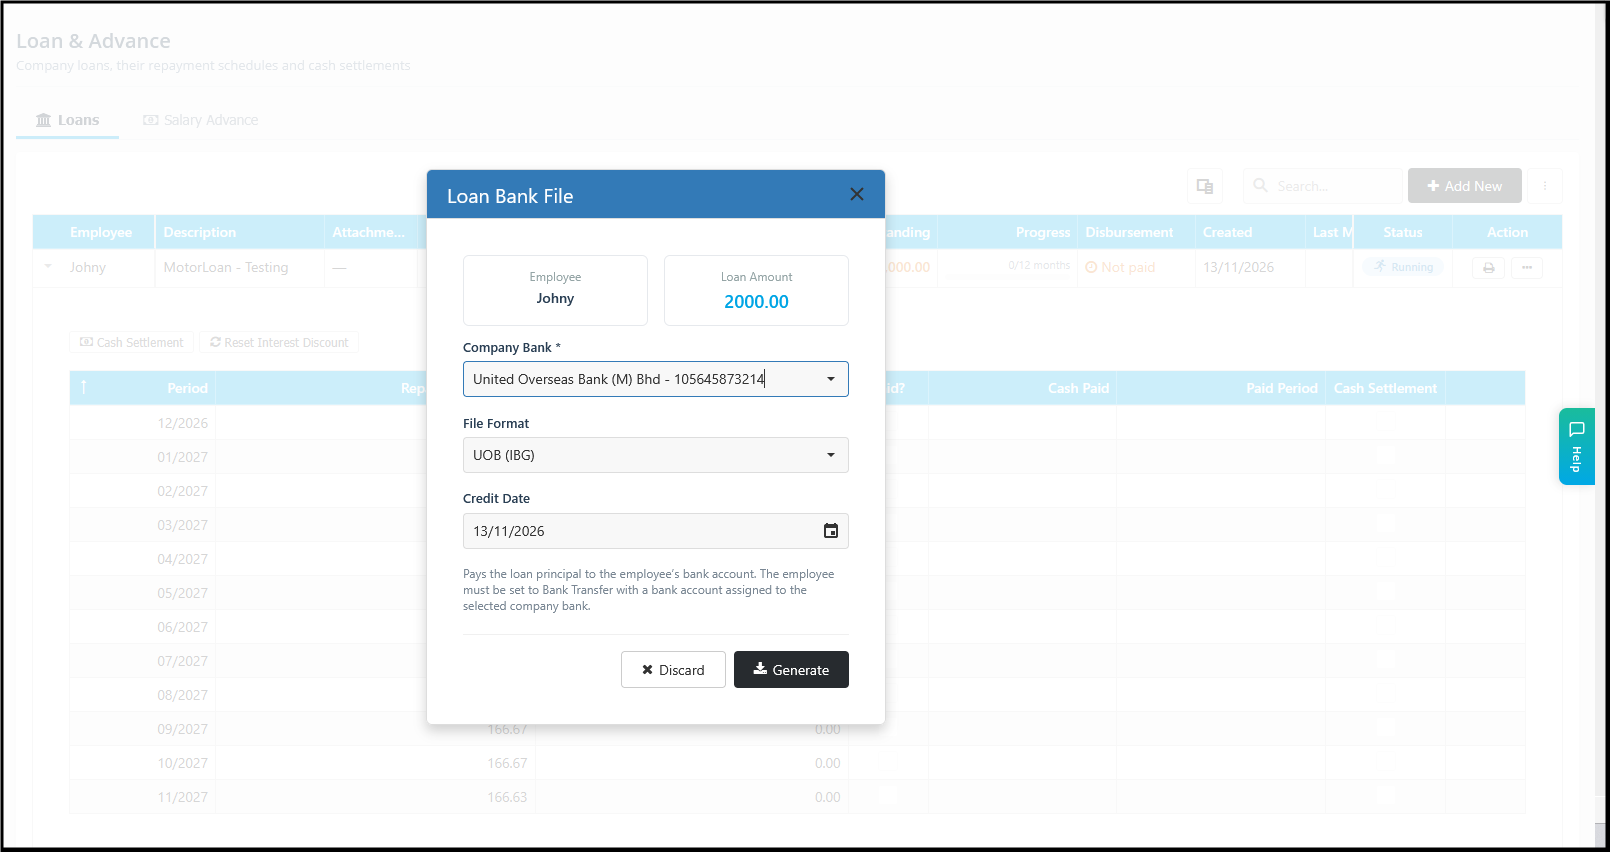
Select the company bank, then click Generate.
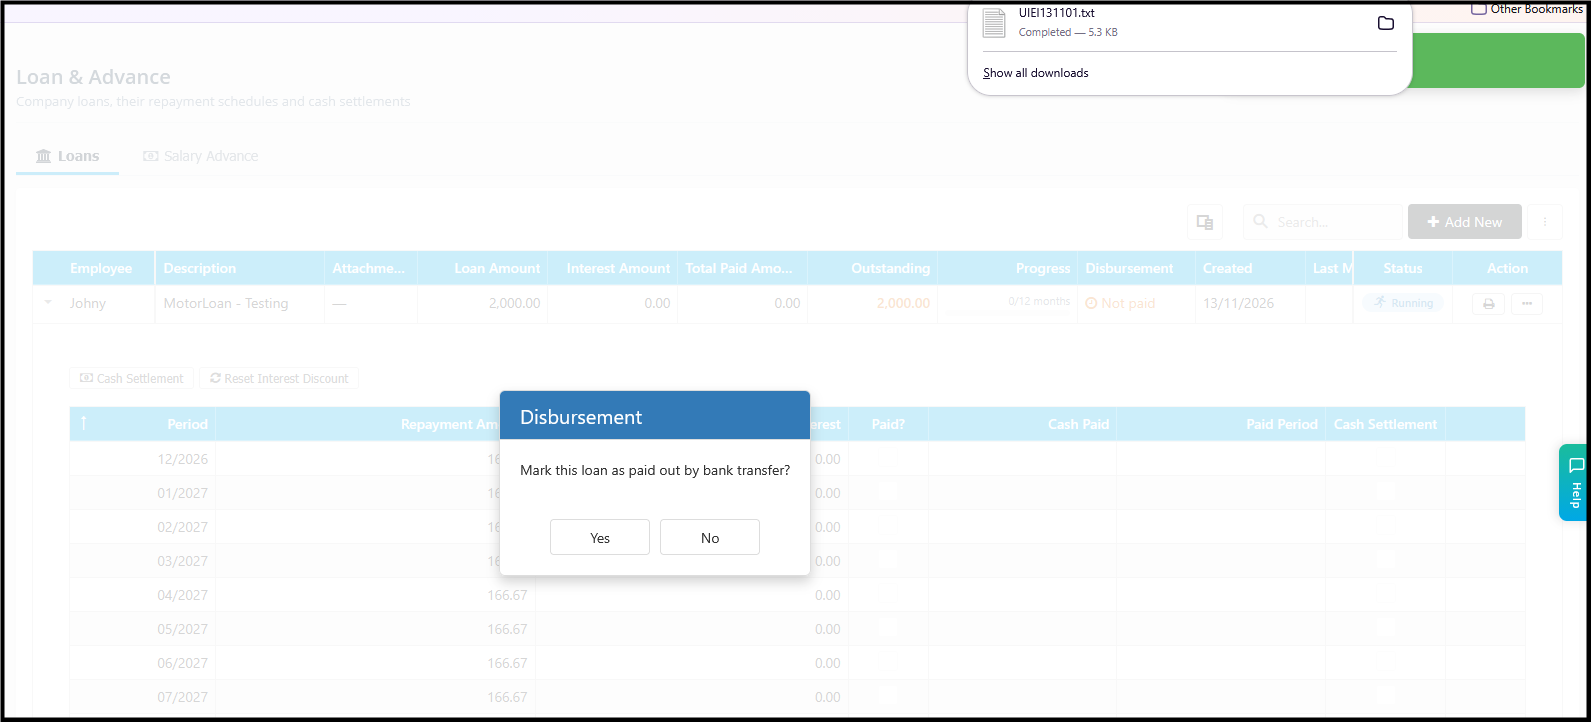
Upload the file to your company’s online banking to pay the loan amount to the employee.
6. Print Loan Receipt
Click the printer icon in the Action column to preview and print the loan receipt.
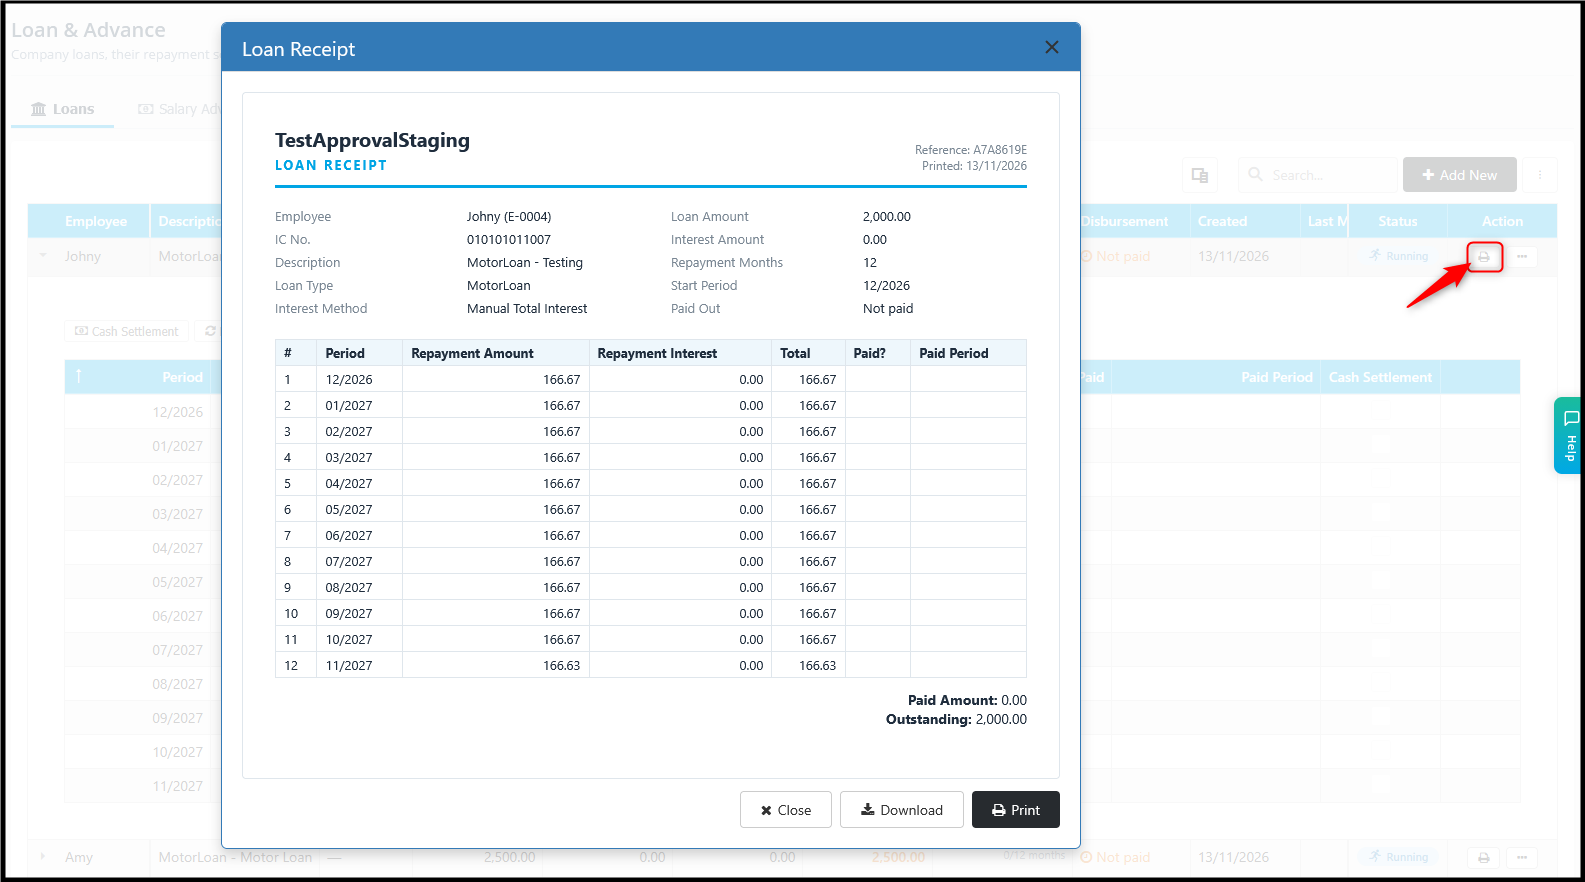
7. Record a cash settlement (Payroll user)
If an employee repays part or all the loan in cash, record it here so payroll deducts only the remaining amount.
Go to Loan & Advance > Loans. In the Action column, click the three dots (…), then select Cash Settlement.
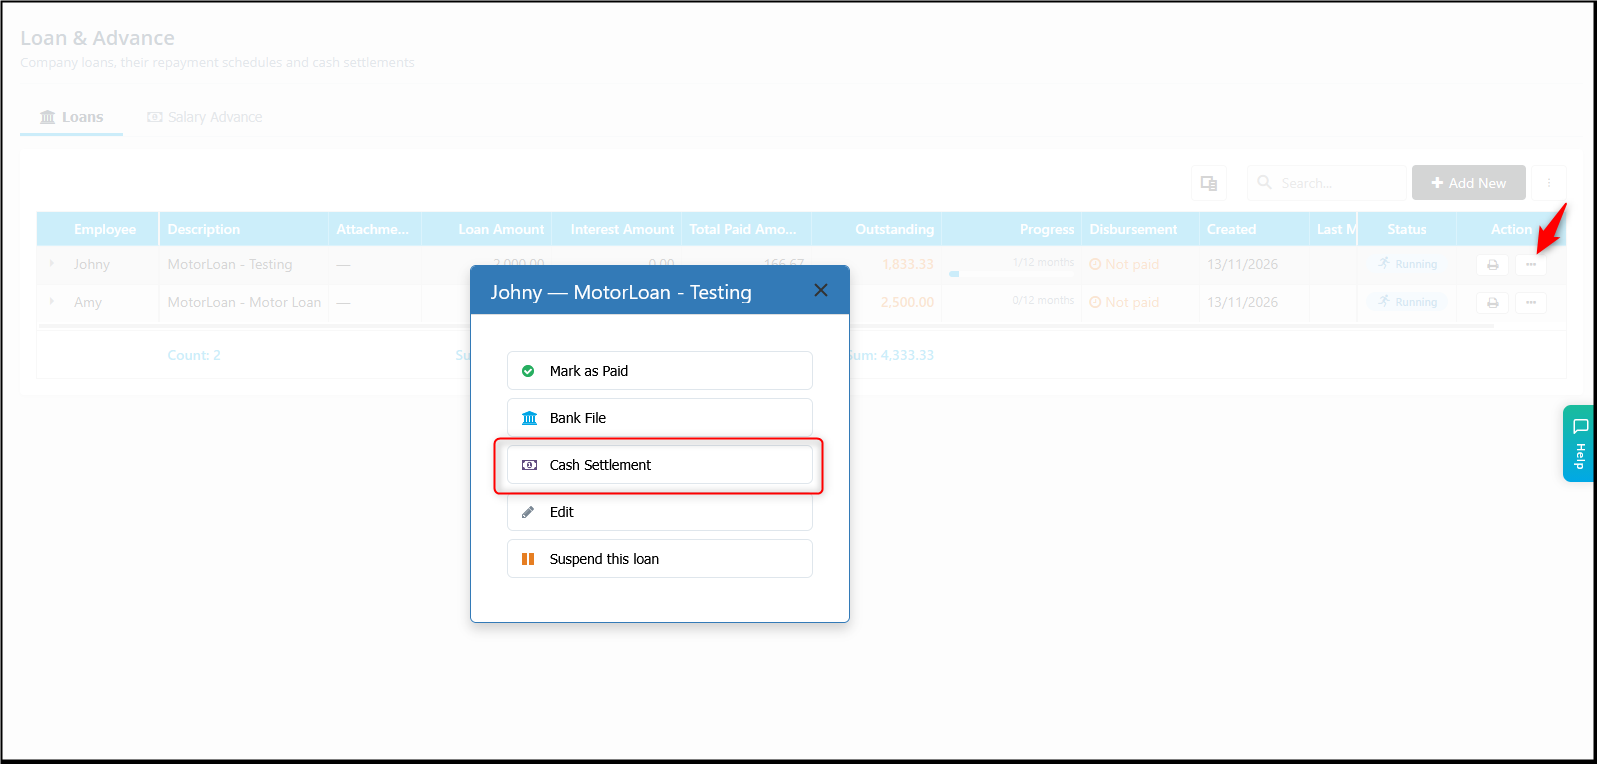
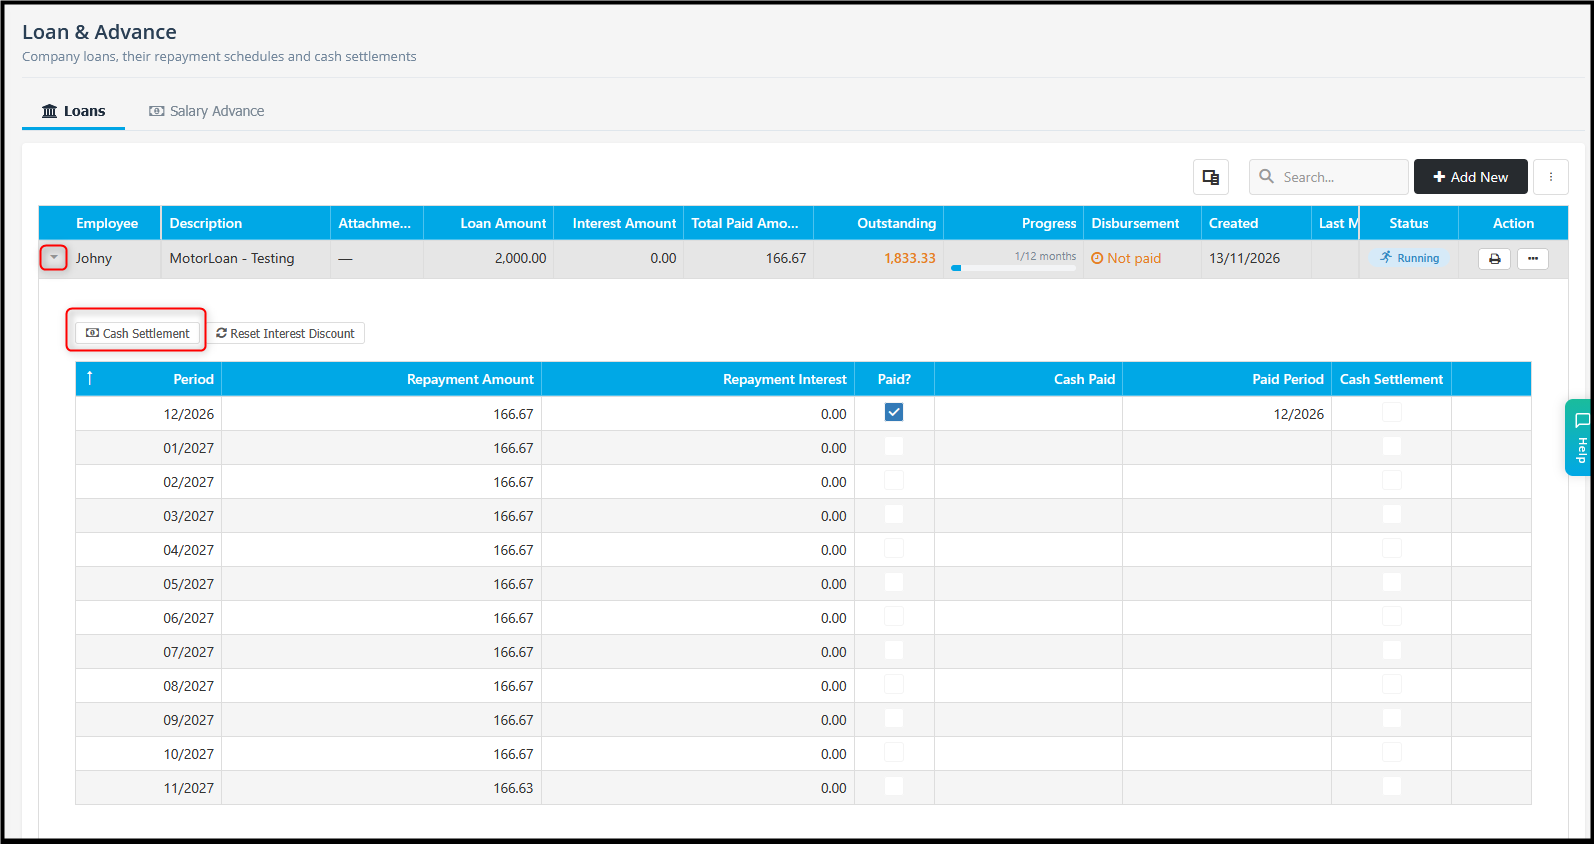
You can also expand the loan row and click Cash Settlement above the repayment schedule.
Choose how the employee is paying:
- Select Months: the employee pays the full instalment for one or more months.
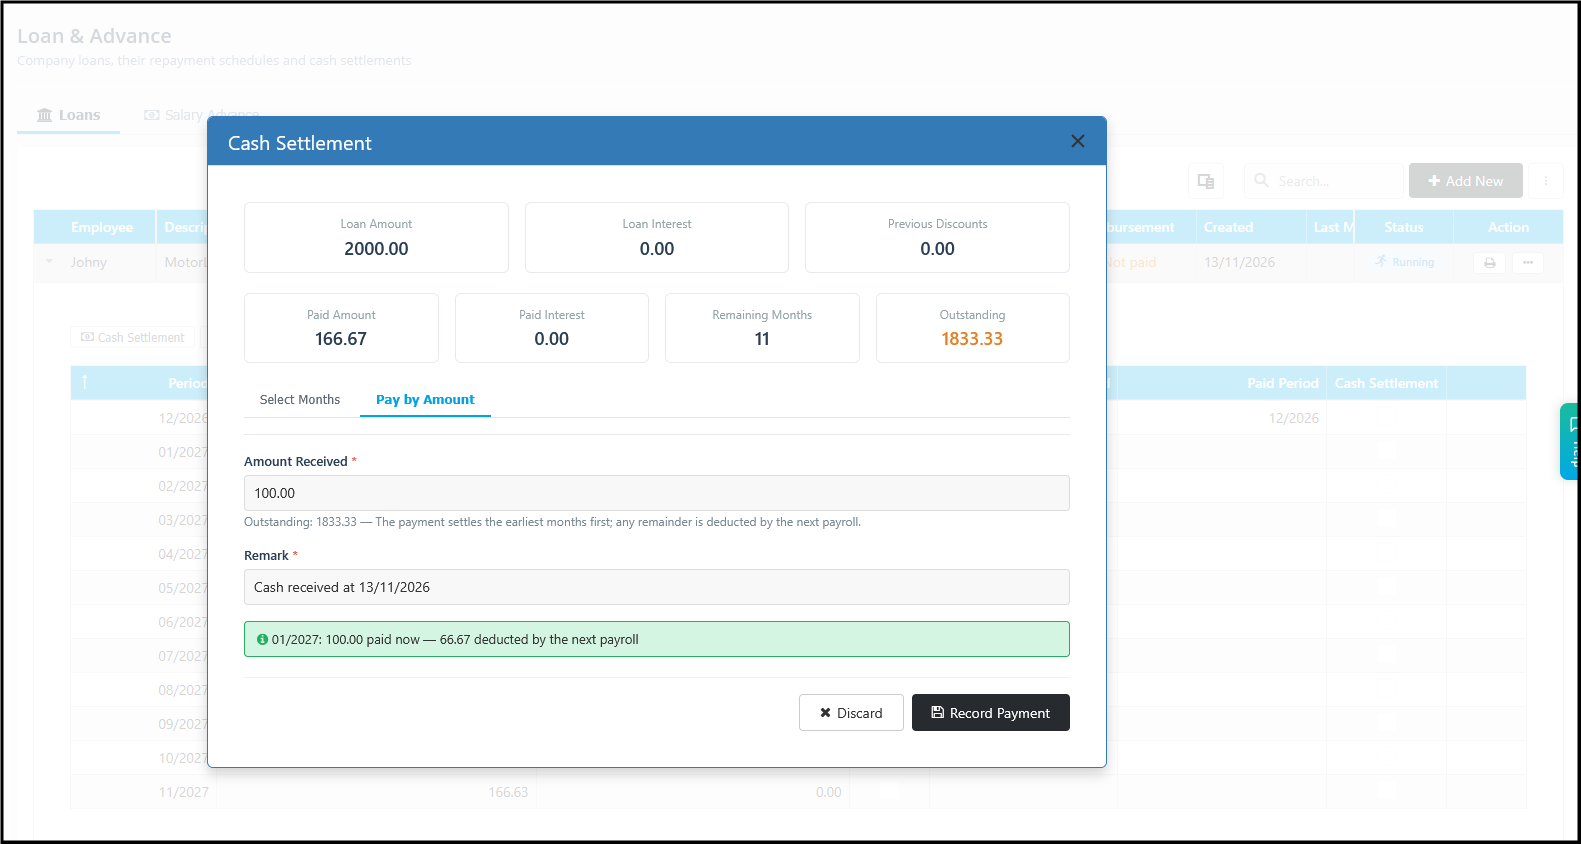
- Pay by Amount (NEW): The employee pays any amounts.
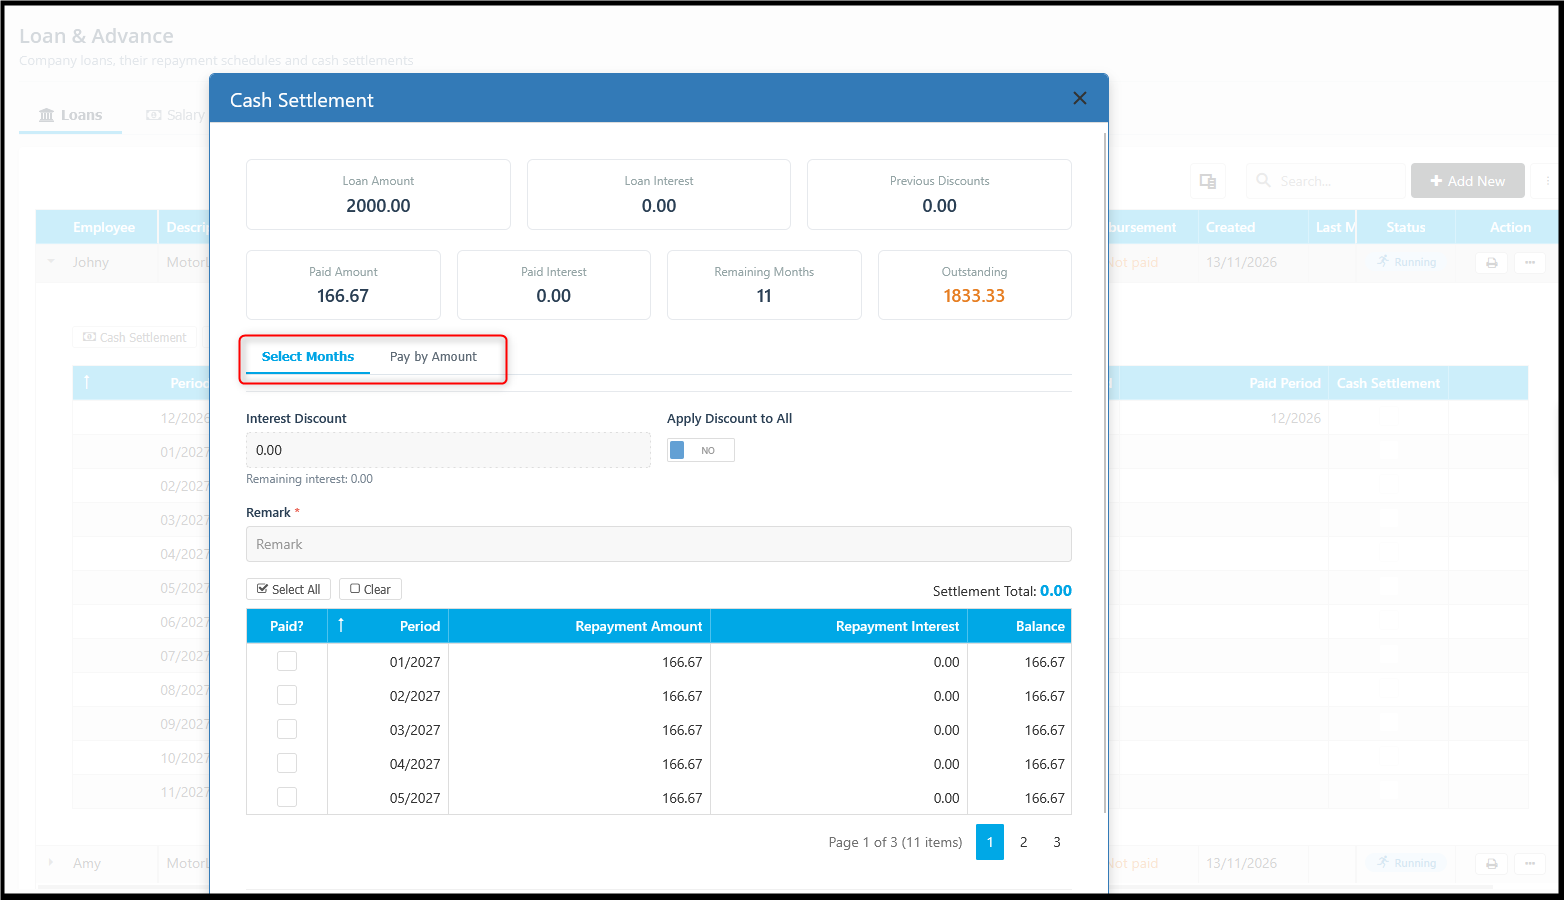
To Pay by Amount:
- Amount Received (required): enter the cash amount the employee paid.
- Remark (required): enter a note, e.g. Cash received on 13/11/2026.
- Check the preview message, then click Record Payment.
How partial payment works:
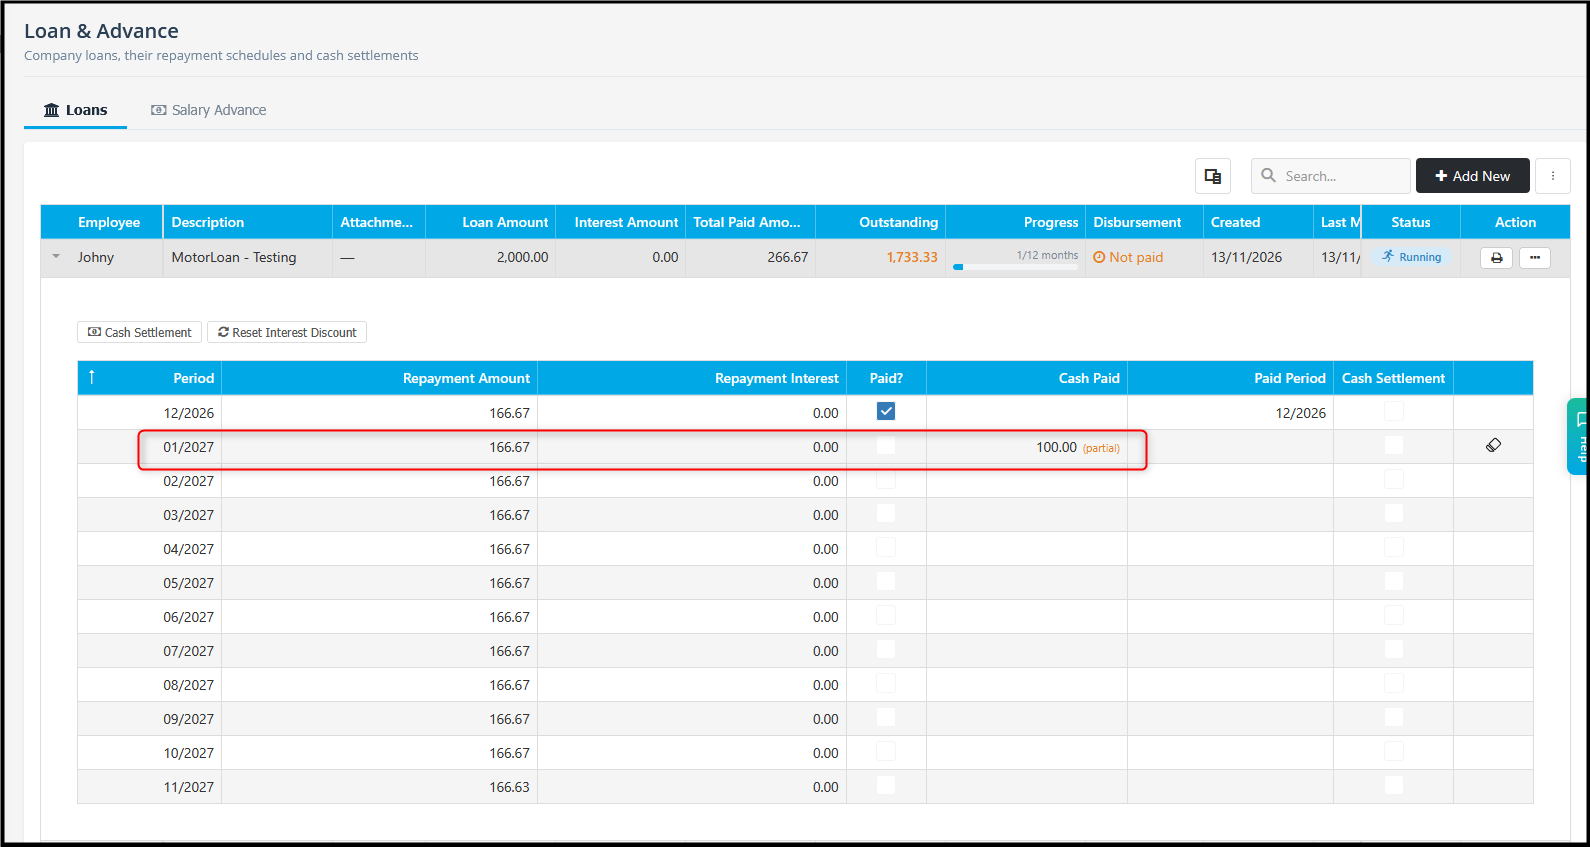
- The cash payment is applied to the earliest unpaid month first.
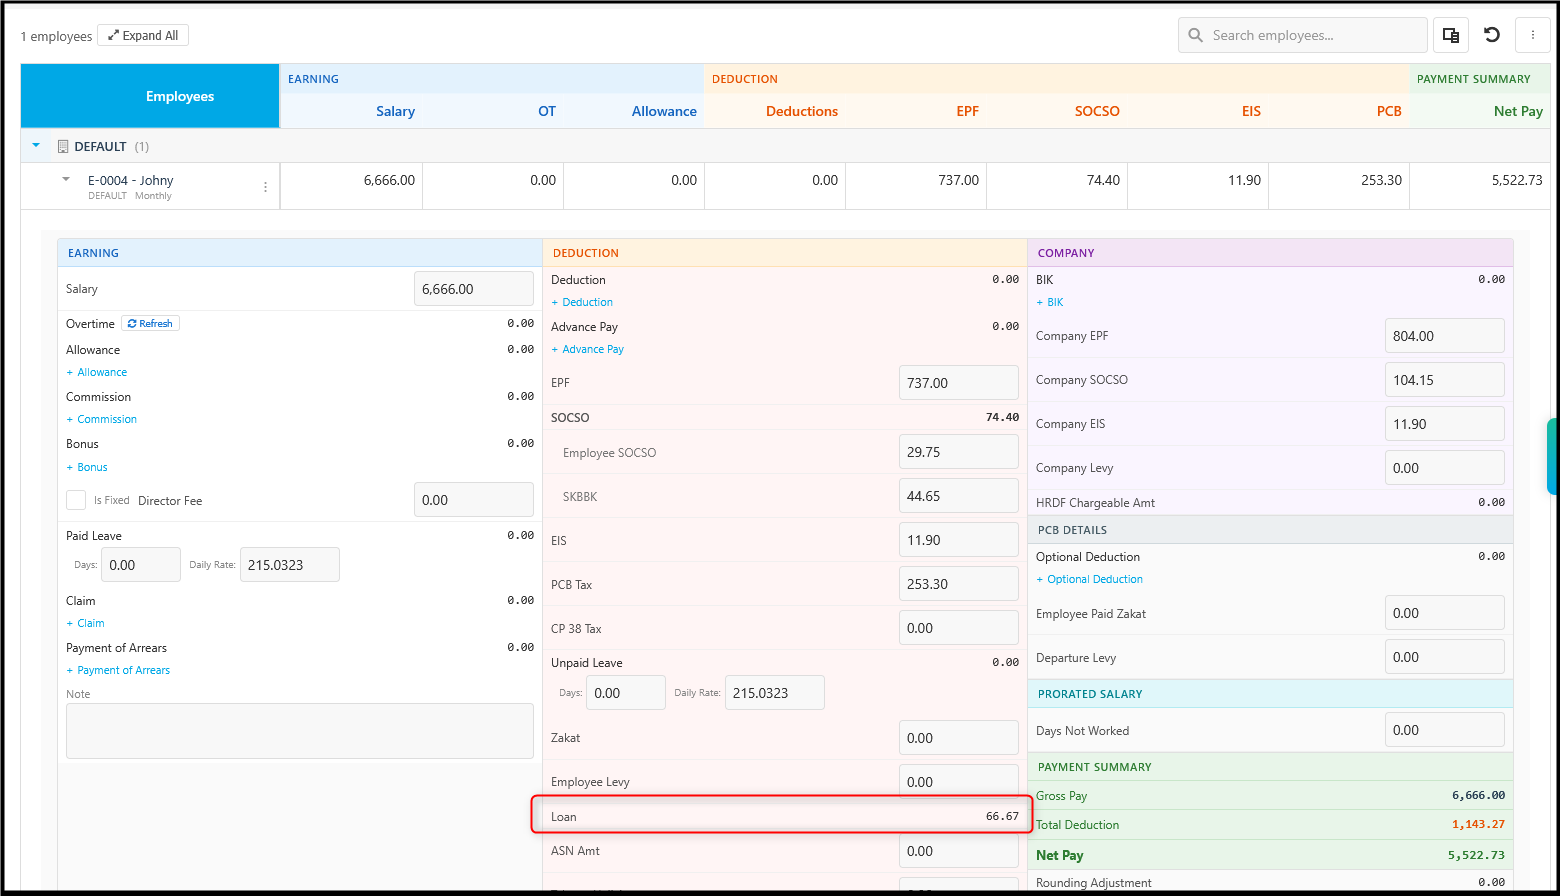
- The remaining amount for that month is deducted in that month’s payroll.
Example: The monthly instalment for January 2027 is 166.67. The employee pays 100.00 in cash, so only the remaining 66.67 is deducted in the January 2027 payroll.
Salary Advance
1. (i) Apply for a salary advance (Employee)
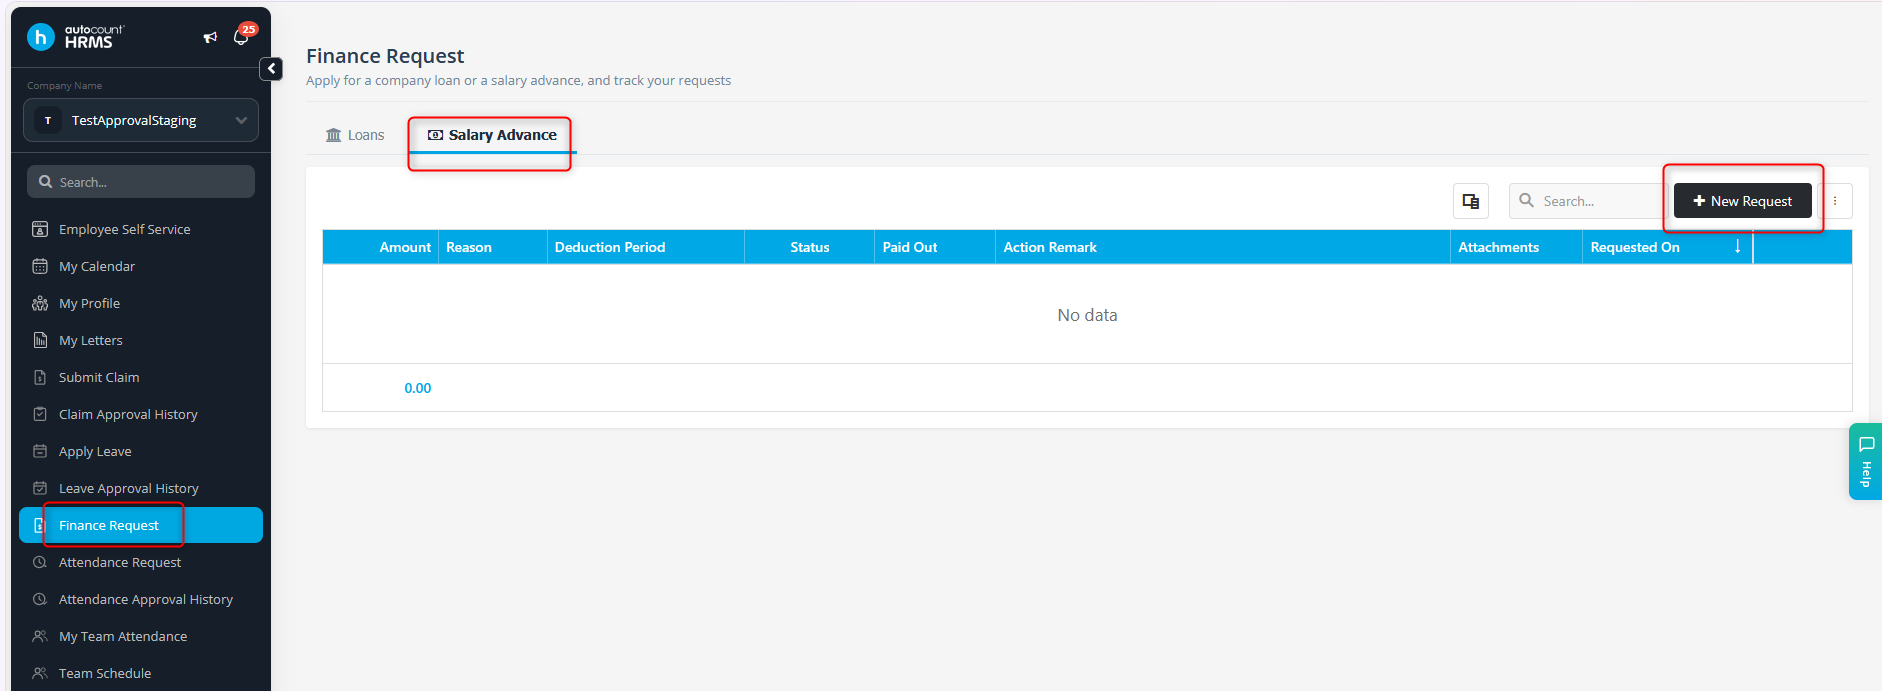
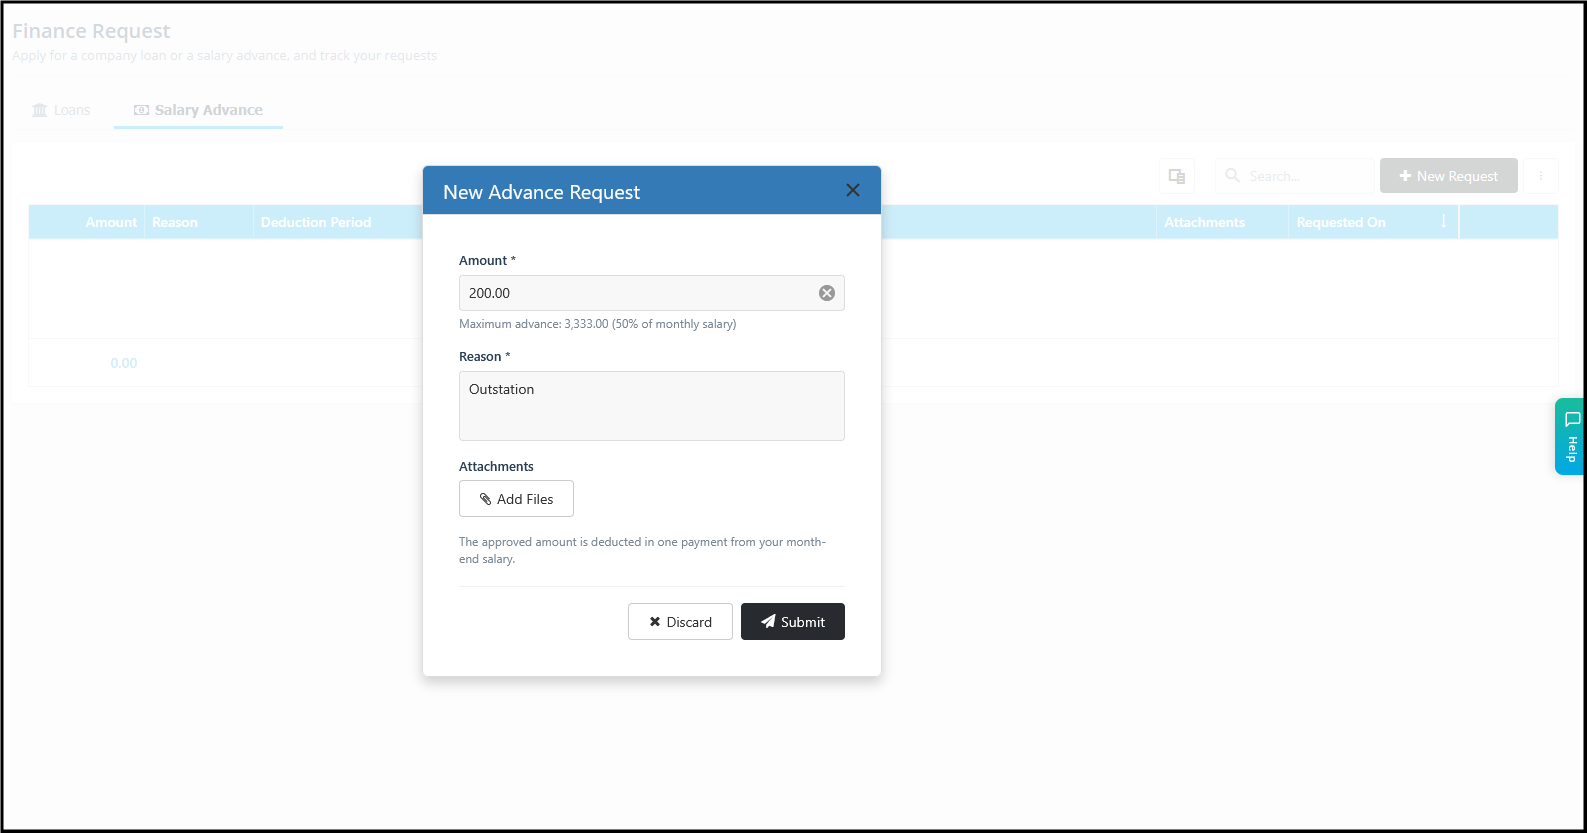
a. Go to Employee Finance > Salary Advance, then click New Request.
b. Fill in the form and click Submit.
- Amount: Enter the amount you need.
- Reason: Explain why you need the advance.
- Attachments (optional): Click Add Files to attach supporting documents.
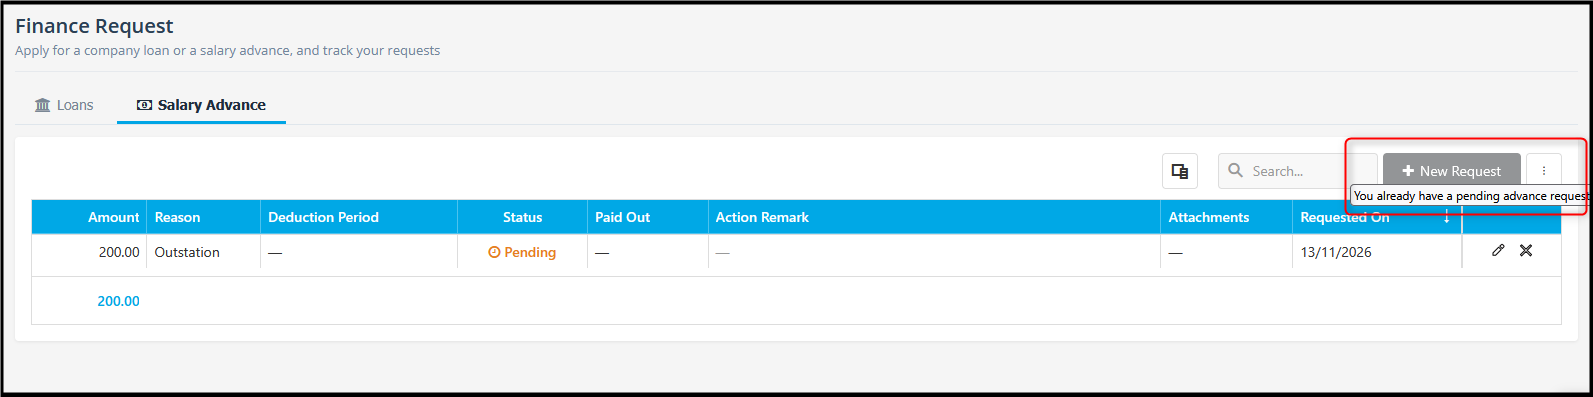
c. You cannot submit a new advance request while another advance request is still pending approval.
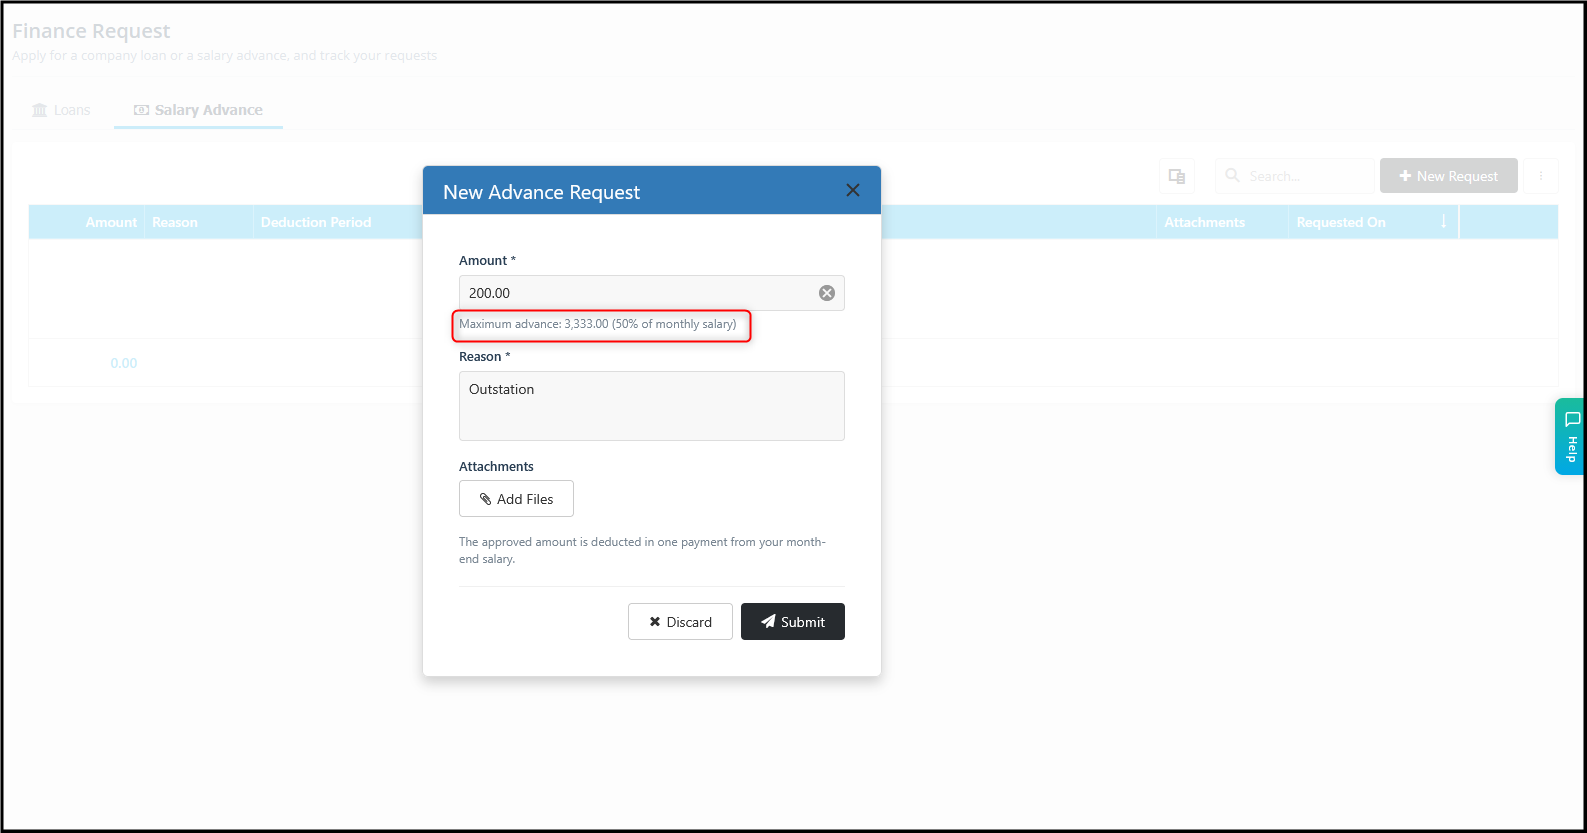
d. Limit: you can request up to 50% of your monthly salary. The maximum amount is shown below the Amount field.
e. Only one salary advance can be deducted per payroll month. If you already have an advance due in a month, your new advance will be deducted in a different month.
1. (ii) Add an advance on behalf of an employee (Payroll user)
A payroll user can create a salary advance for an employee, for example when the employee can’t apply through the system.
Go to Employee Finance > Loan & Advance > Salary Advance, then click New Advance.
Fill in the form and click Save.
- Employee (required): select the employee from the list.
- Amount (required): enter the advance amount. The maximum (50% of the employee’s monthly salary) is shown below this field.
- Reason (required): enter the reason for the advance.
- Attachments (optional): click Add Files to attach supporting documents.
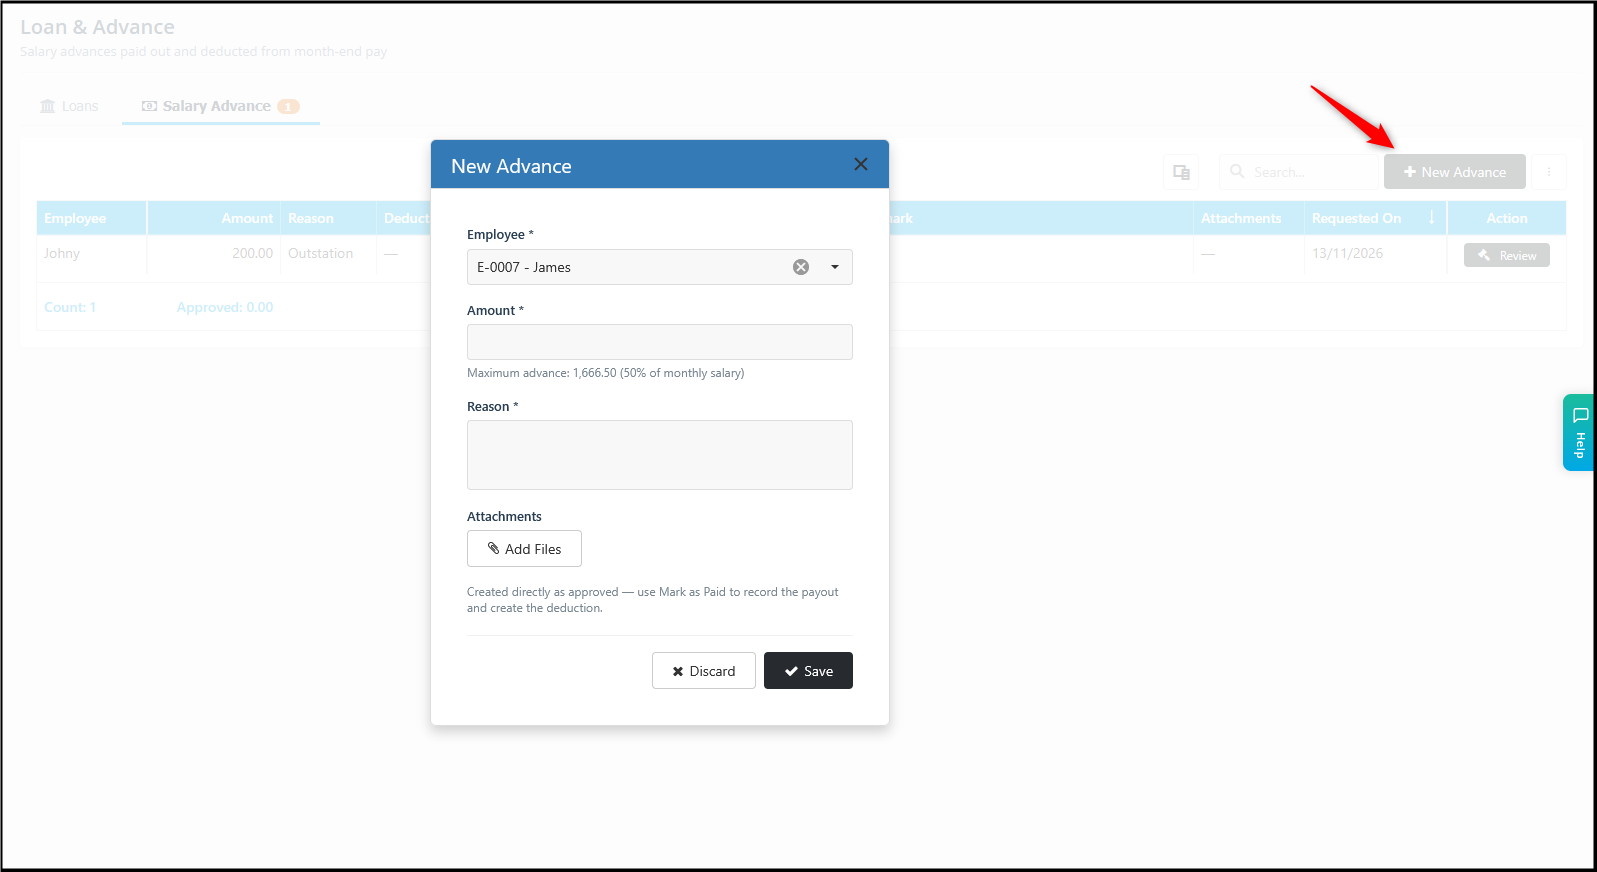
Note: An advance added by a payroll user is approved automatically, so skip Step 2 (Approve the advance request). Go straight to Step 3: Mark the advance as paid and select the deduction period.
2. Approve the advance request (Payroll user)
You don’t need to set up an approval workflow. Any payroll user with access to employee’s Entitlement Group or loan module can approve the request.
a. Go to Loan & Advance > Salary Advance, then click Review.
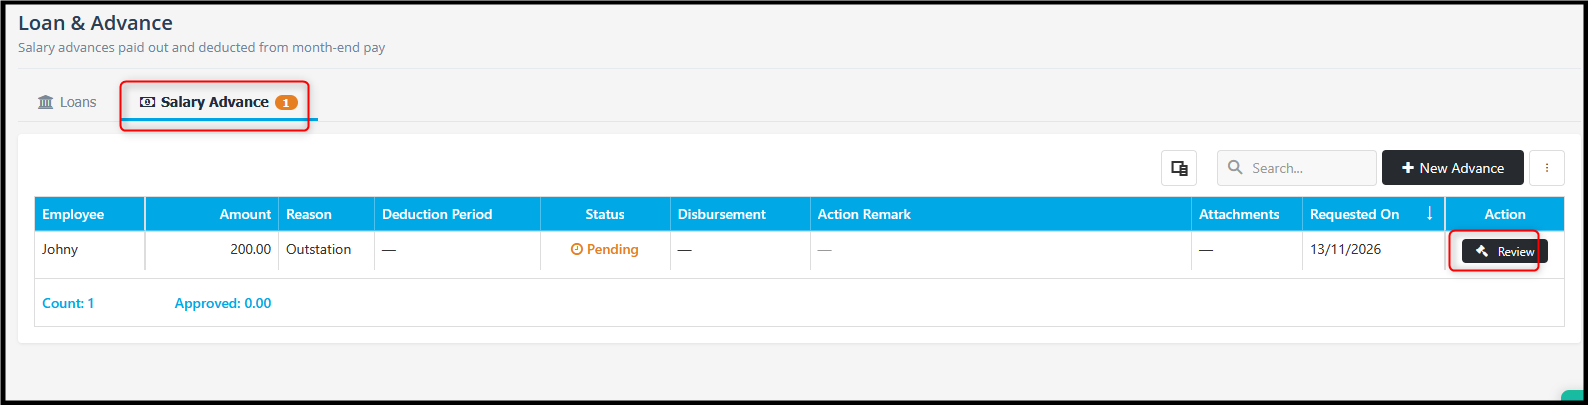
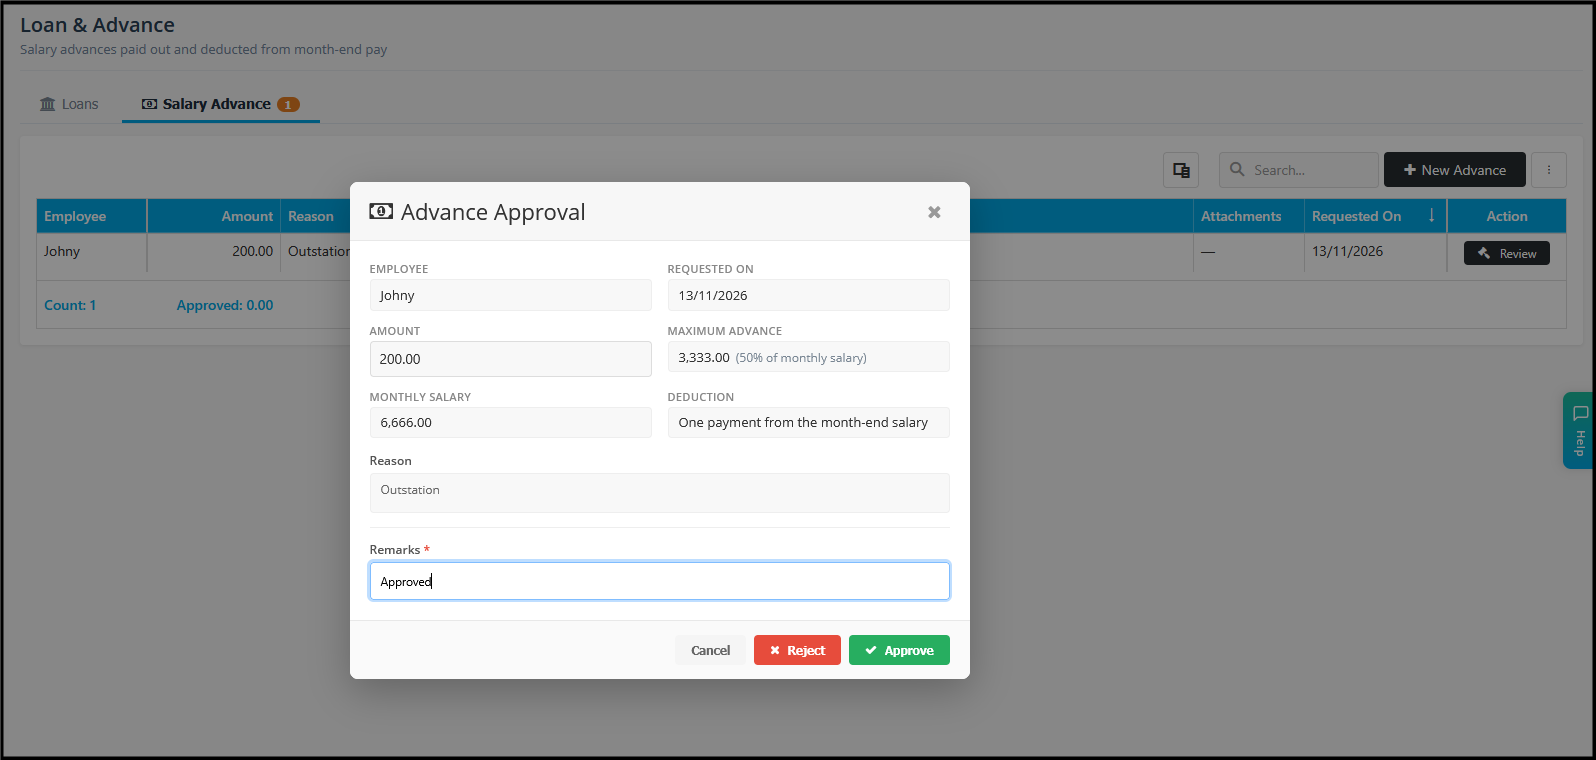
Check the details, enter your remarks, and click Approve.
OR
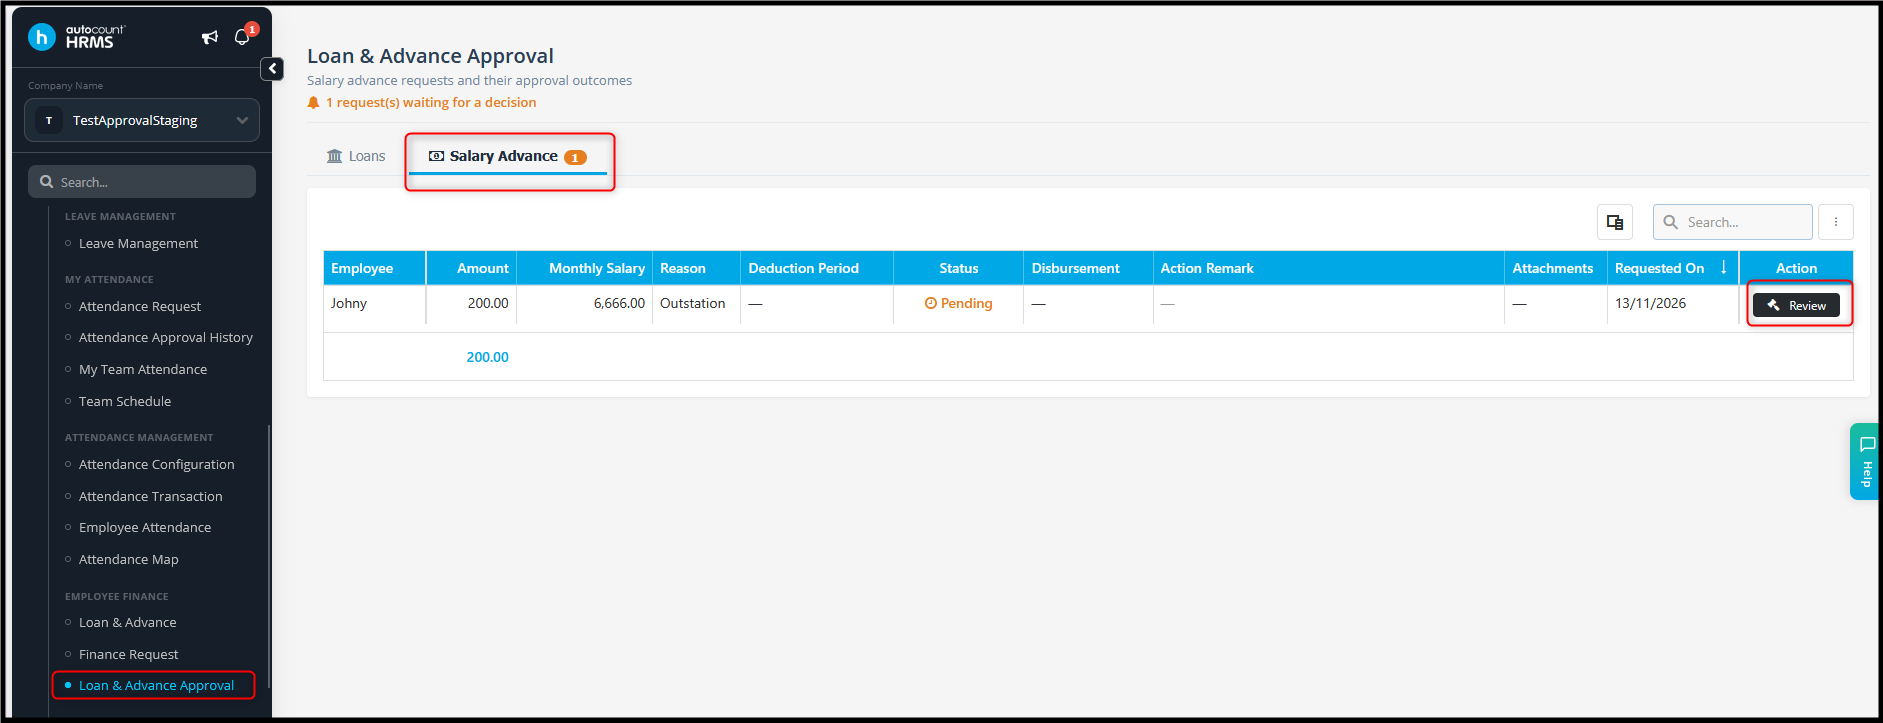
b. Go to Employee Finance > Loan & Advance Approval > Salary Advance, then click Review.
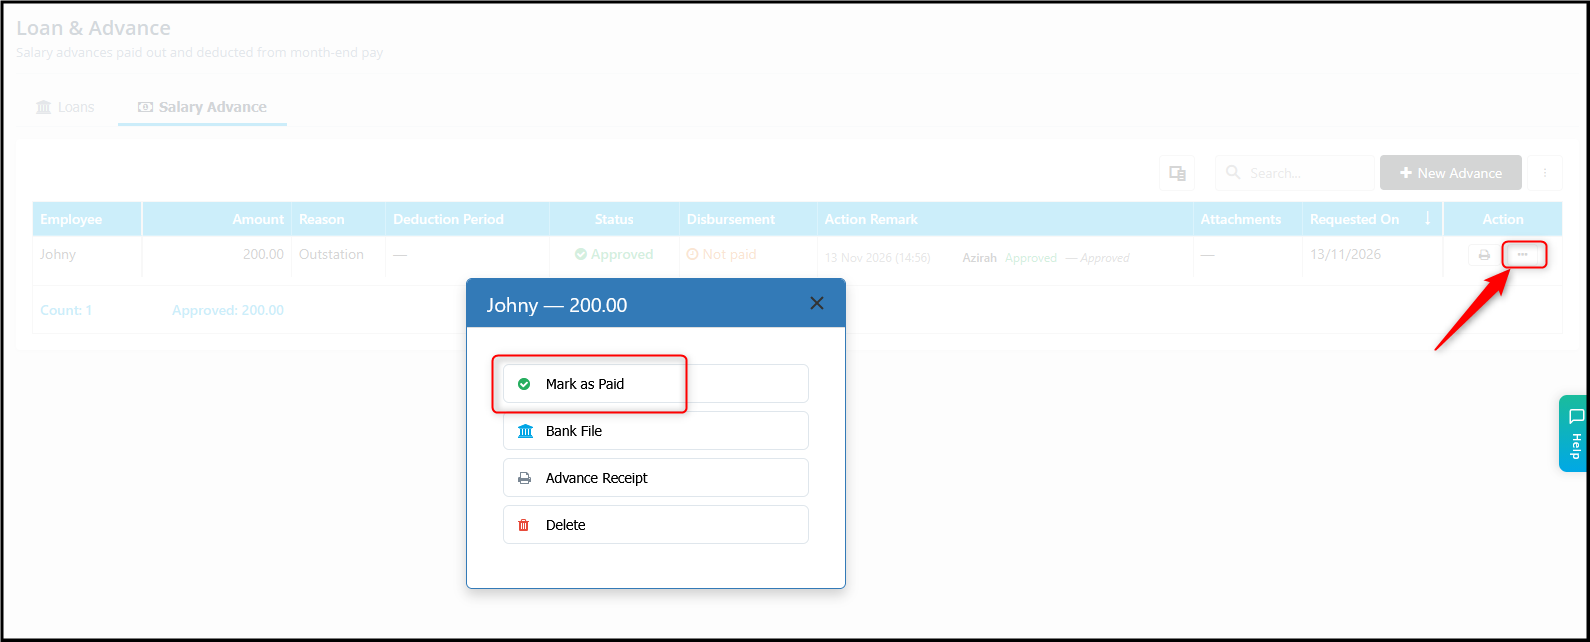
3. Mark the advance as paid and select the deduction period (Payroll user)
Go to Loan & Advance > Salary Advance. In the Action column, click the three dots (…), then select Mark as Paid.
Fill in the details and click Save.
- Payment Method: Select Bank Transfer or Cash.
- Payment Date: The date the advance is paid to the employee.
- Deduction Period: The payroll month when the advance will be deducted.
- Reference (optional): A note for your own reference, e.g. Deduct at Dec 26 Payroll.
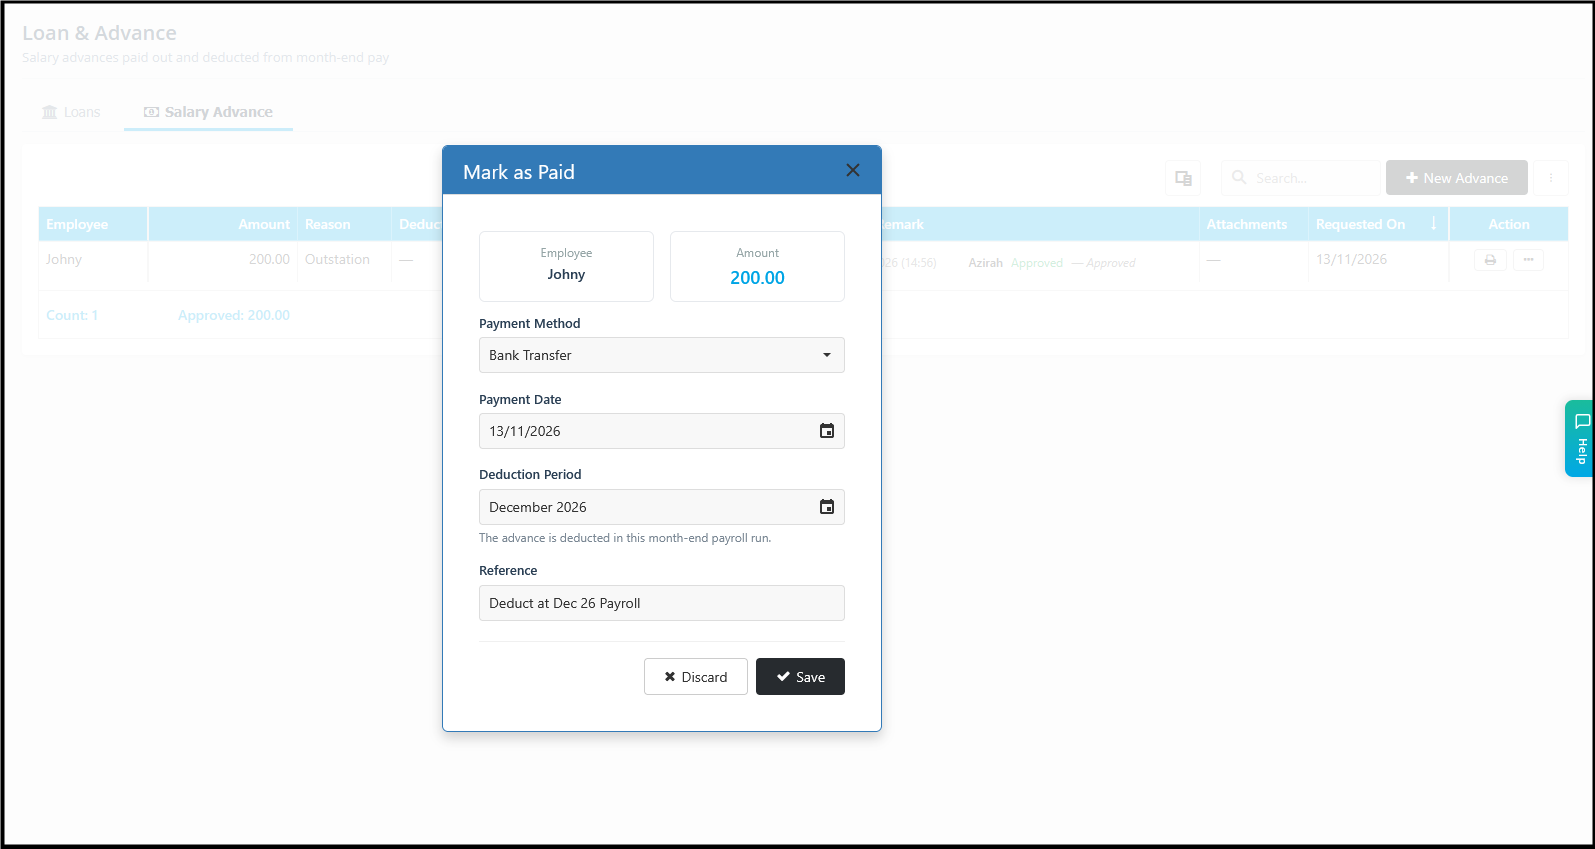
Note: Each employee can have only one salary advance deducted per payroll month. If the employee already has an advance in the selected deduction period, select a different month as the Deduction Period.
4. Generate the bank payment file (Payroll user)
You can generate a bank payment file once the advance is approved.
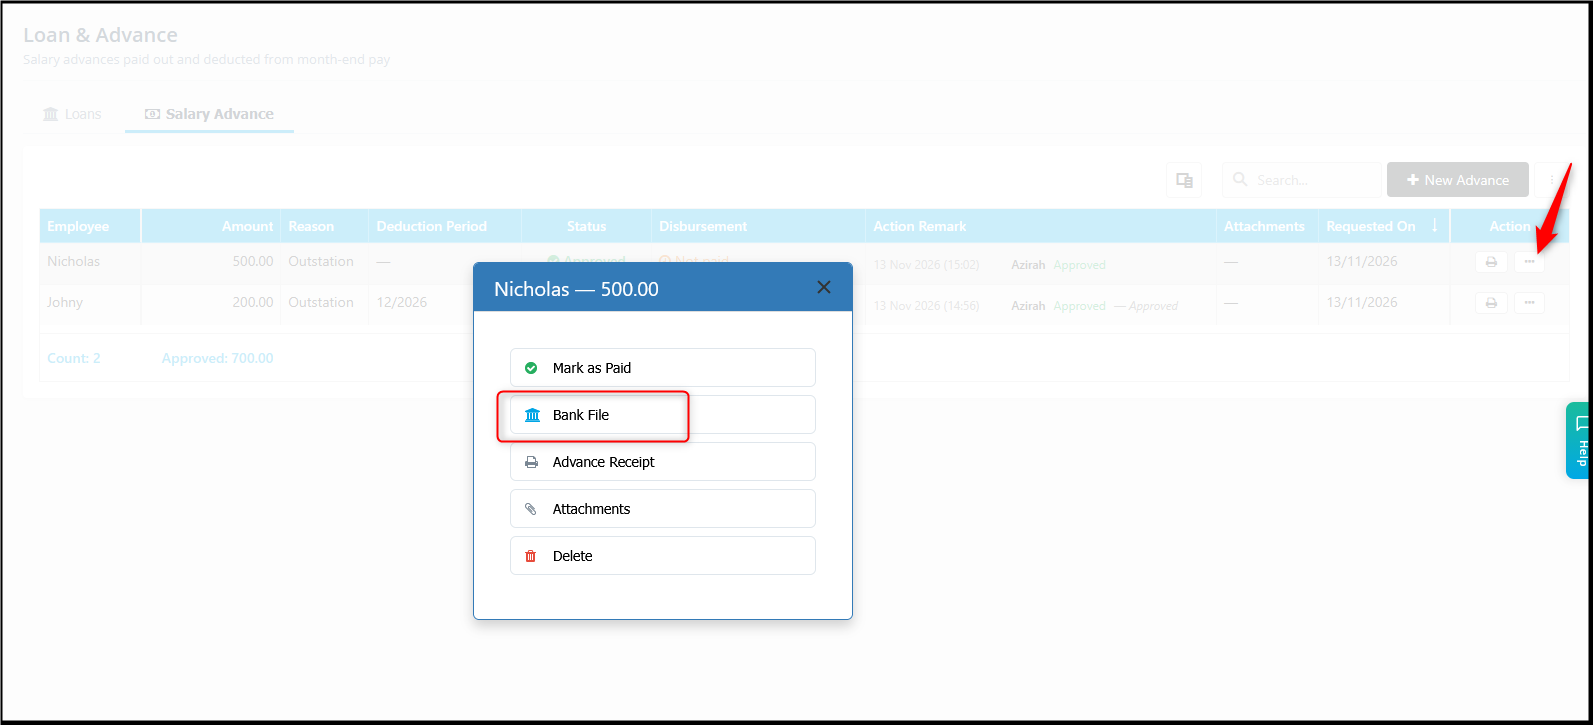
Go to Loan & Advance > Salary Advance. In the Action column, click the three dots (…), then select Bank File.
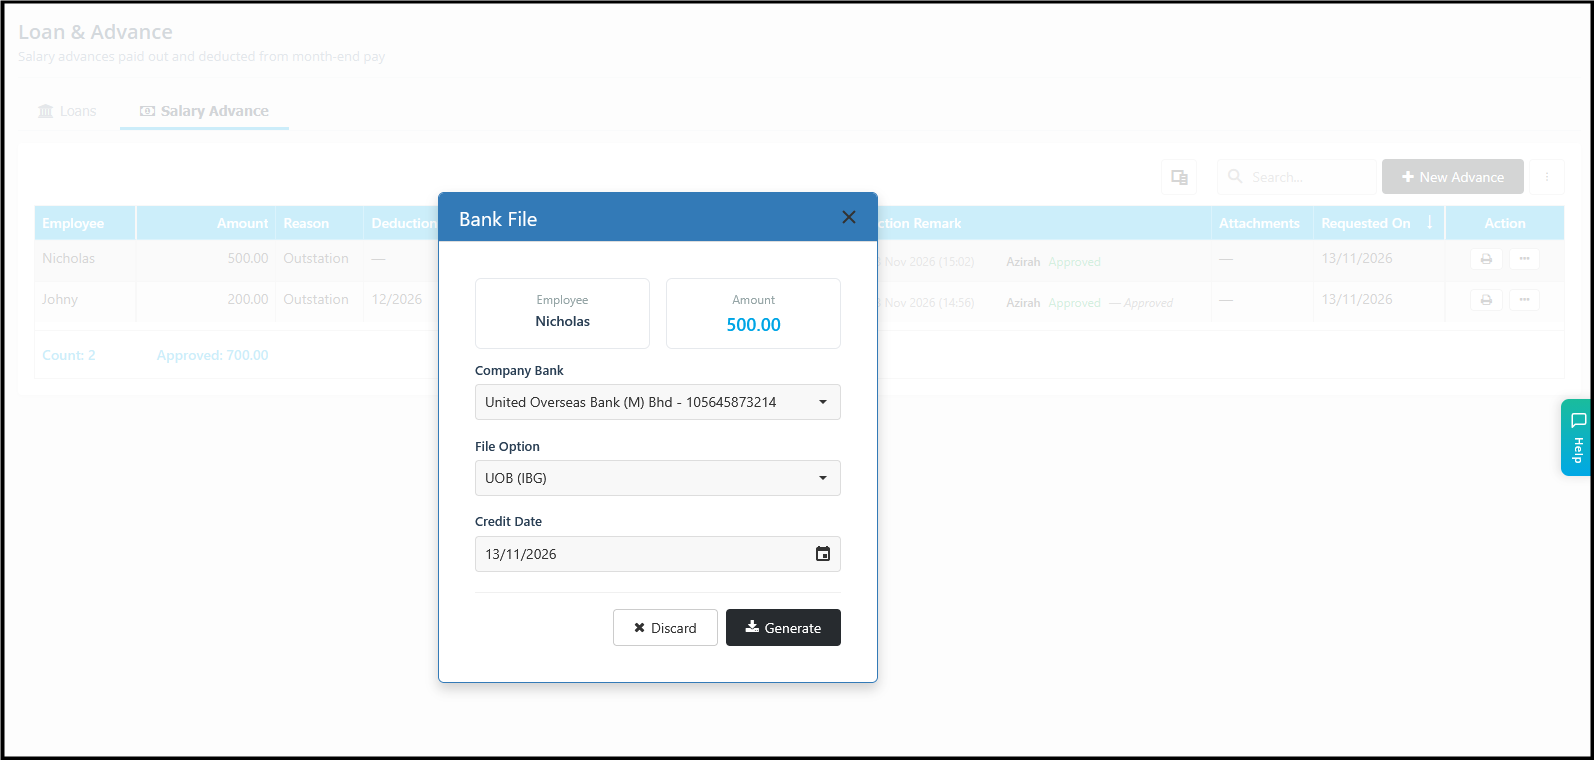
Select the company bank, then click Generate.
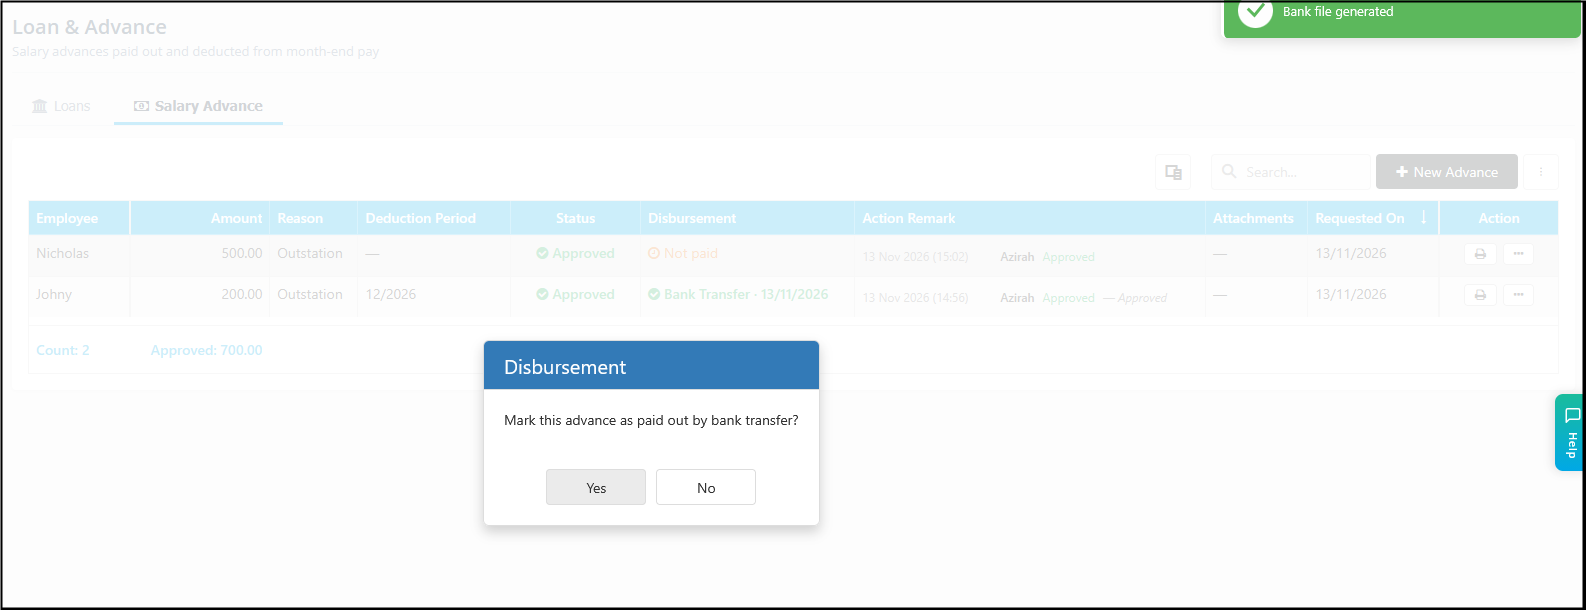
Upload the file to your company’s online banking to pay the advance to the employee.
5. Print the advance receipt
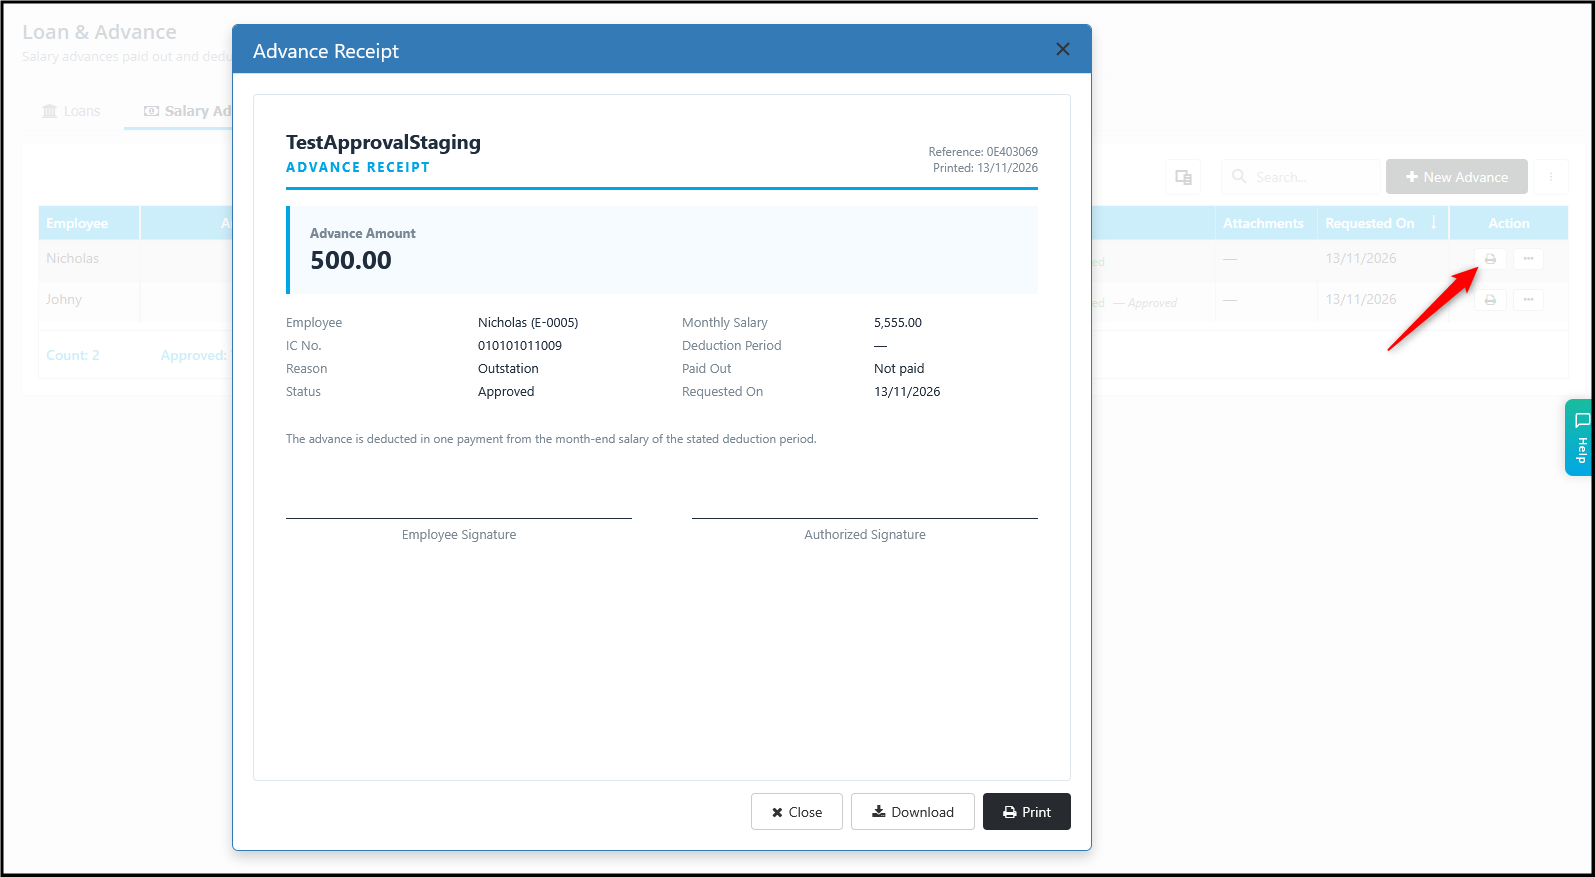
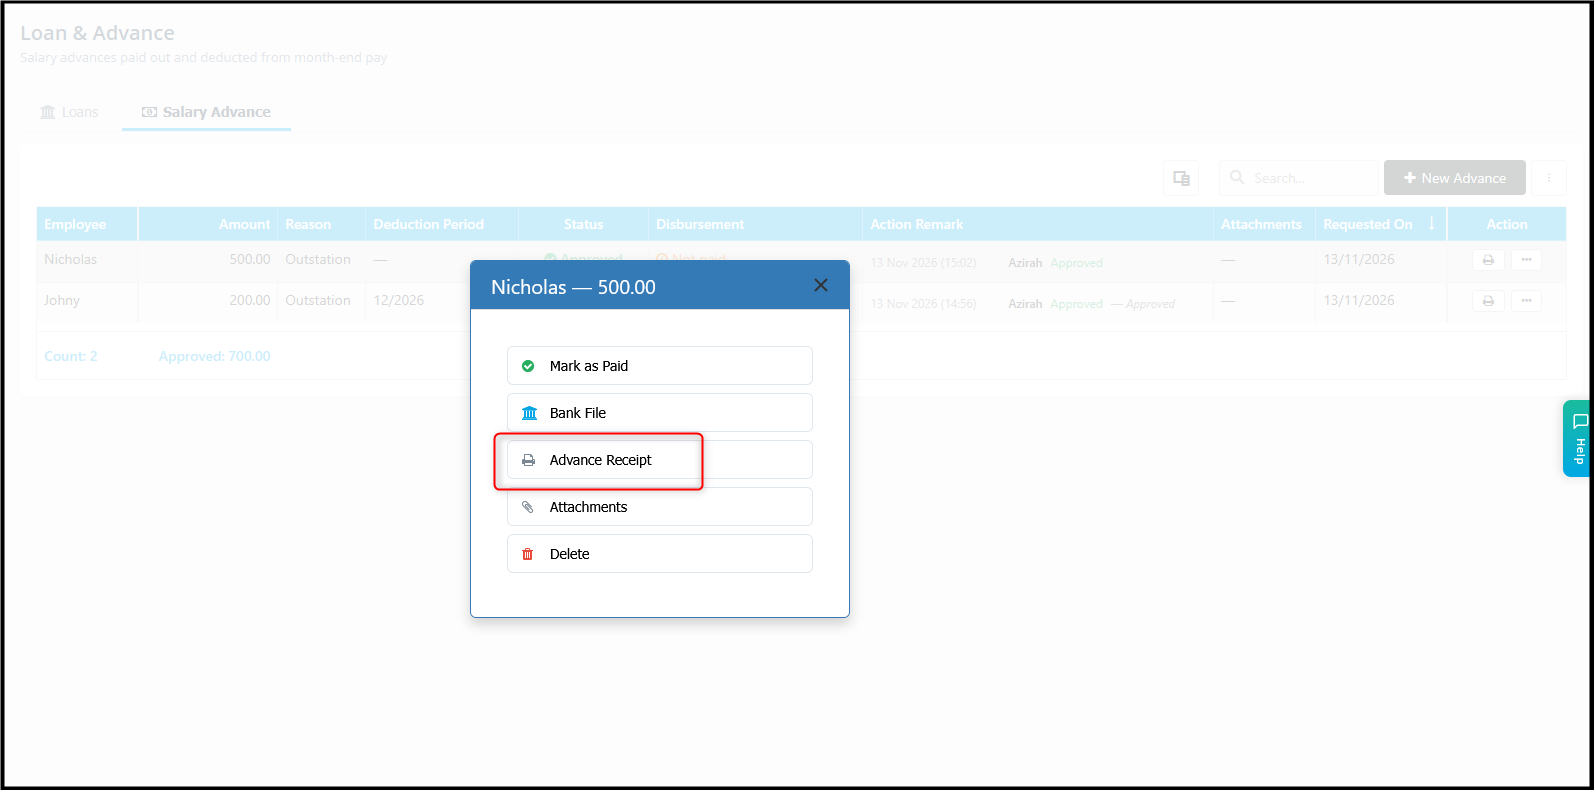
To preview and print the advance receipt, either click the printer icon in the Action column, or click the three dots (…) and select Advance Receipt.
6. Check the advance in Adhoc Payroll Items
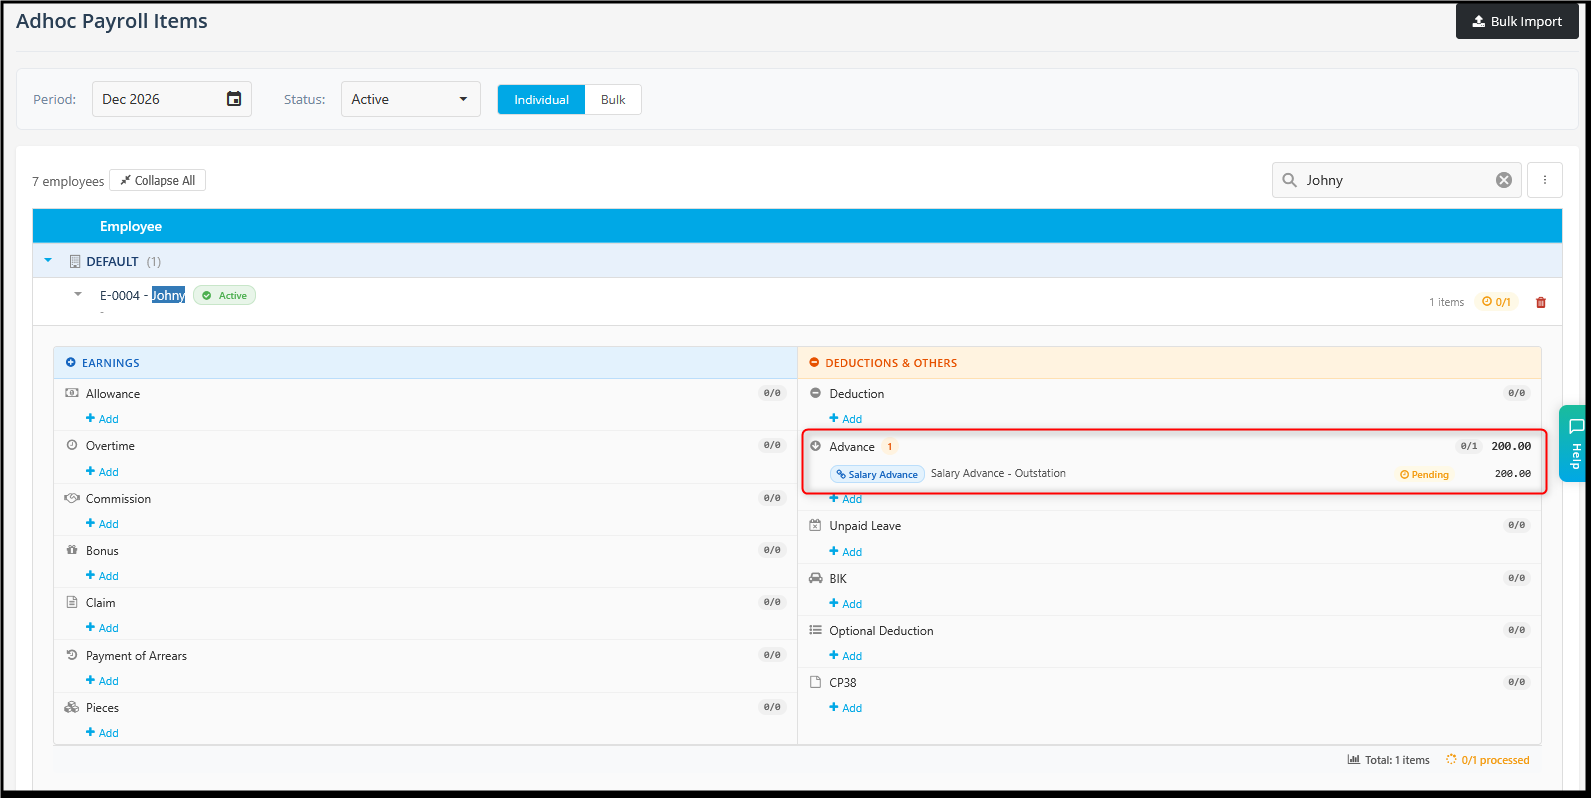
Go to Payroll > Adhoc Payroll Items. Advances marked as paid will appear here under the deduction period you selected. These records are read-only and can’t be edited.
7. Check the Advance deduction in Payroll Process
Go to Payroll > Process Payroll. When you process payroll for that month, the advance is deducted automatically under Deduction > Advance Pay.